
Desserts
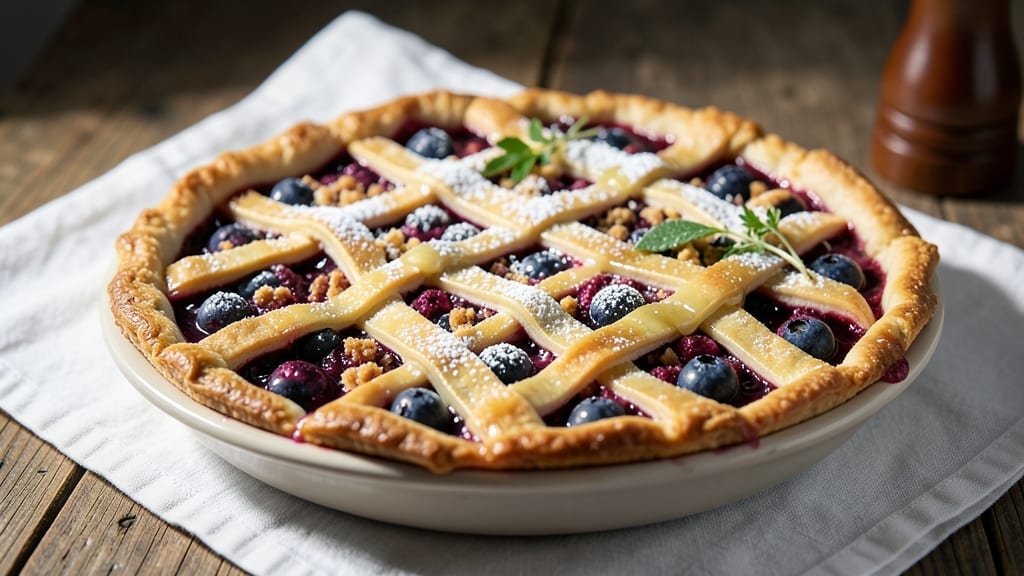
This 9-inch blueberry pie recipe delivers a perfect balance of flaky lattice crust and juicy, bursting blueberry filling that tastes like summer in every bite. The secret lies in pre-cooking the fruit to prevent a soggy bottom while keeping the filling thick and vibrant.
I've baked this pie countless times for family gatherings, and it never fails to disappear faster than the plates hit the table.
What sets this recipe apart is the lattice crust—elegant yet simple to create—with its signature diamond pattern that allows steam to escape while keeping the filling tender.
The crust itself is made with a simple pie dough that's rolled out just thick enough to hold its shape during baking, yet still crisp up beautifully.
The filling combines fresh blueberries with a touch of lemon juice for brightness, cornstarch for thickening, and just the right amount of sugar to enhance their natural sweetness.
By the time it emerges from the oven, you'll have a pie with a golden, shimmering crust and filling that's thick enough to hold its shape when sliced, yet still juicy enough to make your mouth water.
The aroma alone will have everyone gathering in the kitchen, and the first bite delivers that perfect combination of flaky crust and sweet-tart blueberry goodness. This is the kind of pie that makes you feel like you've earned your dessert.
The best part? This recipe scales beautifully for holidays or potlucks, and the leftovers—if there are any—are even better the next day when the flavors have had time to meld.
Whether you're a seasoned baker or just starting out, this blueberry pie delivers restaurant-quality results with simple techniques and a foolproof method.
Ingredients for 9 inch blueberry pie
These 12 simple ingredients create a showstopping pie that'll disappear faster than you can slice it.
| Ingredient | Amount | Notes |
|---|---|---|
| Fresh Blueberries 🫐 | 4 cups | Washed and dried thoroughly |
| Granulated Sugar 🍚 | 1 ½ cups | White or light brown |
| All-Purpose Flour 🌾 | ¼ cup | For thickening filling |
| Cornstarch 🌾 | 2 tbsp | For perfect thickening |
| Lemon Juice 🍋 | 2 tbsp | Freshly squeezed |
| Unsalted Butter 🧈 | ¾ cup | Cold, cubed for crust |
| All-Purpose Flour 🌾 | 2 ½ cups | Plus 2 tbsp for rolling |
| Salt 🧂 | ½ tsp | Fine sea salt |
| Ice Water 💧 | ½ cup | For dough binding |
| Large Egg 🥚 | 1 whole | For egg wash |
| Granulated Sugar 🍚 | 1 tbsp | For egg wash |
| Heavy Cream 🥛 | 1 tbsp | Optional for brushing |
Blueberries are the star—pick the freshest, firmest berries you can find. Local farmers markets or grocery store pre-washed packs work great. If using frozen, thaw and drain them completely to avoid a watery filling. The sugar amount balances sweetness perfectly, but adjust to taste if your berries are extra tart. For that restaurant-quality touch, King Arthur Flour or Bob's Red Mill all-purpose flour makes the crust extra tender. And trust me on the cornstarch—it's what keeps that filling thick and glossy without being gluey.
No cornstarch? Arrowroot powder works 1:1, but cornstarch gives that classic pie filling texture. Short on butter? Coconut oil works too, though it adds a slight coconut flavor. The lattice crust is where the magic happens—cut the dough strips just under 1/2-inch wide for those perfect diamond patterns. For extra flakiness, chill your dough for at least 1 hour before rolling. And if you're feeling fancy, brush the finished lattice with heavy cream before baking for that golden sheen.
This pie tastes even better the next day—store leftovers covered at room temperature for up to 2 days. For longer storage, wrap tightly and freeze for up to 3 months. The lattice crust stays crisp for about 24 hours, so serve it fresh if you can. Pro tip: Bake the filling ahead and refrigerate it overnight—it thickens beautifully and tastes more developed. And if you're making this for a crowd, double the recipe—two 9-inch pies disappear just as fast as one!
Why You'll Love This Recipe
- No Fuss Filling: I swear by the cornstarch trick—just toss those blueberries with sugar, lemon juice, and a pinch of flour, then bake. No thickener mess, no overmixing, just a filling that bubbles up juicy and golden without fighting you.
- Taste Like Summer: That bright lemon splash cuts through the sweetness while the sugar caramelizes just enough to make every bite taste like a sun-warmed berry patch. Honestly, store-bought filling can’t compete with fresh blueberries and this simple balance.
- Weeknight or Wows: Same crust, same filling—works for a lazy Tuesday dinner with vanilla ice cream or a brunch spread that’ll impress your in-laws. (Yes, even on a Tuesday night.) The 9-inch size is perfect for sharing without leftovers going to waste.
- Budget-Friendly Staples: Flour, sugar, and cornstarch are pantry basics, and blueberries stretch further than you’d think when you bake them down. I’ve made this pie for under $8, and it still tastes like a splurge. Leftovers? Reheat slices in the oven—they’re even better the next day.
Step-by-step instructions for 9-Inch blueberry pie
Here's how to create that perfect balance of juicy blueberries and flaky lattice crust.
👨🍳 Step 1: Prepare the Blueberry Filling
In a large bowl, combine the 4 cups fresh blueberries, 1.5 cups granulated sugar, 0.25 cup all-purpose flour, and 2 tbsp cornstarch. Gently toss until the sugar and flour evenly coat the berries—this prevents a gummy filling. The sugar will begin to dissolve slightly, creating a syrupy base.
Transfer the mixture to a 9-inch pie dish and spread it evenly. Pour the 2 tbsp lemon juice over the top and gently stir to distribute. The acidity brightens the blueberries and helps thicken the filling. Don't skip this step—it makes all the difference in texture and flavor.
🍳 Step 2: Make the Pie Crust Dough
In a food processor, pulse the 0.75 cup cold unsalted butter until it resembles coarse crumbs. Add the 2.5 cups all-purpose flour and 0.5 tsp salt, then pulse until the mixture resembles coarse meal with pea-sized butter pieces. With the processor running, slowly add the 0.5 cup ice water until the dough just comes together.
Turn the dough onto a lightly floured surface and divide it into two equal discs. Wrap each in plastic wrap and refrigerate for at least 1 hour. Chilling is crucial—it prevents the butter from melting during rolling and ensures a flaky crust. If you're in a hurry, chill for 30 minutes in the freezer instead.
🥘 Step 3: Assemble the Pie
Roll out one disc of dough to fit your 9-inch pie dish, leaving a 1-inch overhang on all sides. Gently drape it over the dish, then trim the excess. Roll out the second disc for the lattice top—cut it into 1-inch strips using a pizza cutter or sharp knife. Press the rolled-out dough into the pie dish, crimping the edges to seal.
Arrange the lattice strips in a herringbone pattern, alternating directions with each row. Brush the top with a mixture of the 1 whole large egg beaten with 1 tbsp granulated sugar and 1 tbsp heavy cream (if using). This creates a golden, glossy finish and adds sweetness. Preheat your oven to 375°F while the lattice sets for 5 minutes—this prevents it from sticking.
🔥 Step 4: Bake to Golden Perfection
Bake the pie for 45-50 minutes until the crust is deep golden brown and the filling bubbles gently at the edges. If the lattice starts browning too quickly, loosely cover it with aluminum foil. The filling should be thickened but still slightly jiggly in the center—it will set as it cools.
Let the pie cool completely on a wire rack for at least 2 hours before slicing. This resting time allows the filling to set properly and prevents a runny pie. Serve warm or at room temperature with a scoop of vanilla ice cream for the ultimate experience!
Pro Tips For Making 9 Inch Blueberry Pie
- Preheat That Oven: I learned this the hard way—skipping preheating means your crust spends the first 10 minutes playing catch-up while the filling boils. For a 9-inch pie, aim for 375°F (190°C) and give it 15 minutes to heat through. That’s the difference between a golden, flaky crust and a sad, pale one.
- Toss Berries Like a Pro: Dumping raw blueberries into sugar without tossing guarantees a runny, soupy mess. Use 2 tablespoons lemon juice (yes, even if the recipe says less) and 1-2 tablespoons cornstarch—mix it thoroughly by hand (no lazy spoon-dumping). The starch needs to cling to every berry, or you’ll regret it later.
- Skip the Overfilling: I was skeptical until I tried it—fill the crust only ¾ full. Blueberries expand when they cook, and an overstuffed pie will either spill over or stay undercooked. If you’re nervous, press the filling down lightly with a spoon before baking. Trust me, the pie will thank you.
- Bake with a Water Bath: Sounds weird, but it works: Place your pie on a baking sheet, then add a shallow tray of hot water underneath. The steam keeps the crust from drying out while the filling cooks evenly. Remove the water after 20 minutes—just enough time to guarantee a tender bottom without sogginess. (Yes, even if you’re impatient like me.)
Dietary considerations for 9 inch blueberry pie
Gluten-Free Adaptations
For a gluten-free version, swap the all-purpose flour in the crust for a 1:1 gluten-free flour blend like Bob's Red Mill or King Arthur Measure for Measure. Use 2.5 cups of the blend plus 2 tbsp extra gluten-free flour for rolling to prevent sticking.
The filling stays the same, but add 1 extra tbsp cornstarch to compensate for the different texture. Chill the dough 30 minutes longer to prevent crumbling during assembly. 🌾
Dairy-Free Crust
Replace the 0.75 cup butter with 0.75 cup dairy-free margarine or coconut oil for a vegan crust. Use King Arthur Vegan Baking Mix for the flour to ensure proper binding.
The filling remains unchanged, but brush the lattice with 1 tbsp maple syrup instead of the egg wash for a glossy finish. This keeps the pie flaky and delicious without dairy. 🥥
Lower Sugar Options
Reduce the 1.5 cups granulated sugar to 1 cup and add ¼ cup honey or maple syrup for natural sweetness. The berries' tartness balances the flavor beautifully. For a diabetic-friendly version, use 1 cup monk fruit sweetener (like Lakanto) and 1 tbsp erythritol for texture.
Taste the filling before baking—adjust sweetness to preference. 🍯
Nut-Free Filling
Skip any nut-based thickeners (like almond flour) and stick with cornstarch or arrowroot powder for thickening. The original recipe already avoids nuts, but if you're concerned about cross-contamination, use a separate bowl and utensils for handling blueberries. Always check your flour for nut-free certifications. 🌰
Allergen-Friendly Storage
Store gluten-free or dairy-free pies in airtight containers with parchment paper between layers to prevent sticking. Label clearly with allergen info. These versions keep well for 3 days at room temperature or 2 months frozen.
Thaw overnight in the fridge before serving to maintain texture. Always reheat to 165°F for safety. ❄️
Nutrition facts
Frequently asked questions
Can I use frozen blueberries instead of fresh?
Yes, but you must thaw and drain them completely first to avoid a watery filling. Spread them on a paper towel to remove excess moisture before measuring. For best results, use high-quality frozen berries without added sugars or syrups.
How do I prevent a soggy bottom crust?
Pre-cook your filling for 10-15 minutes before pouring it into the crust to reduce moisture. Also, blind-bake the bottom crust for 10 minutes at 375°F with pie weights or dried beans before adding filling. This creates a barrier between the wet filling and crust.
Can I make this pie ahead of time?
Assemble the pie (unbaked) and refrigerate for up to 24 hours before baking. For even better flavor, prepare the filling a day ahead and refrigerate it overnight—this lets the flavors develop. The crust can be pre-rolled and frozen for 1 month too.
What's the best way to store leftovers?
Keep your pie covered at room temperature for 2-3 days or refrigerate for up to 5 days. For longer storage, wrap tightly in plastic and freeze for up to 3 months. Thaw overnight in the fridge and reheat slices at 350°F for 10-15 minutes to restore freshness.
Can I substitute the lattice crust with something easier?
Yes! For a simpler top, use a single rolled-out dough disc cut into decorative shapes or a traditional solid top with a slotted spoon. If you prefer no crust at all, try a galette style—just mound the filling on a single dough disc and fold the edges up. Both methods work beautifully.