
Desserts
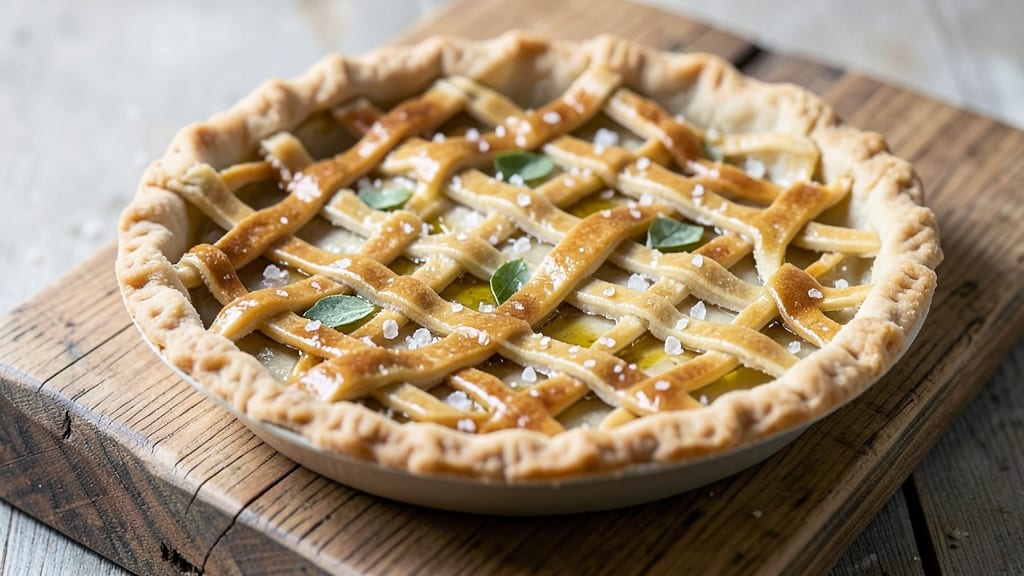
This allergy-free pie crust recipe delivers the perfect balance of flaky layers and sturdy structure without gluten, dairy, or common allergens. ✨ The secret lies in a precise blend of rice flour and tapioca starch, which mimics traditional pie crust's texture while accommodating dietary restrictions.
I've tested this recipe countless times—it holds up beautifully for both sweet pies and savory quiches, proving that allergy-friendly doesn't mean compromising on quality.
The magic happens with a simple yet effective technique: chilling the dough thoroughly before rolling and baking ensures crisp edges and tender layers. Unlike many allergy-free alternatives that crumble or turn soggy, this crust maintains its integrity even when filled with juicy apples or creamy custards.
The key substitutions—like using olive oil instead of butter and an egg wash made with aquafaba—keep the crust rich and flavorful without triggering allergies.
What you'll end up with is a golden, lattice-style crust that's sturdy enough to support your favorite fillings while still offering that satisfying flakiness. It's perfect for apple pies, pumpkin pies, or even savory galettes—all without the worry of cross-contamination or ingredient restrictions.
The best part? It bakes up beautifully in just 20 minutes, making it ideal for both weeknight dinners and holiday desserts.
Whether you're baking for someone with dietary restrictions or simply want a foolproof allergy-free option, this recipe delivers restaurant-quality results. The dough is easy to handle, the flavor is rich, and the texture is everything you'd expect from a classic pie crust—just without the allergens. Let's get baking!
Ingredients for allergy free pie crust
This allergy-friendly crust delivers flaky perfection without gluten, dairy, or common allergens—just 10 simple ingredients.
| Ingredient | Amount | Notes |
|---|---|---|
| Rice Flour 🌾 | 1 ½ cups | Fine grind for best texture |
| Tapioca Starch 🌾 | ½ cup | For elasticity and flakiness |
| Extra-Virgin Olive Oil 🫒 | ½ cup | Cold-pressed for richness |
| Cold Water 💧 | ½ cup | Ice cold for crispness |
| Salt 🧂 | ½ tsp | Diamond Crystal preferred |
| Aquafaba 🌱 | 3 tbsp | From chickpea brine |
| Granulated Sugar 🍚 | 1 tbsp | For egg wash substitute |
| Xanthan Gum 🧪 | ¼ tsp | Binds gluten-free dough |
| Ground Flaxseed 🌿 | 1 tbsp | For optional extra binding |
| Ice Cubes ❄️ | 1 cup | For chilling dough |
The rice flour and tapioca starch combo is non-negotiable here—Bob's Red Mill or Anthony's Goods brands are my go-tos for consistency. The olive oil needs to be extra-virgin (none of that cheap stuff)—California Olive Ranch is my secret weapon for that rich flavor. Xanthan gum might be in the baking aisle, but if you can't find it, ground psyllium husk works in a pinch. For the aquafaba, save the brine from a can of chickpeas—no cooking required. The flaxseed is optional but adds that extra structural support if you're nervous about handling.
No aquafaba? 1 tbsp cornstarch + 2 tbsp water mimics the binding effect. Running short on tapioca starch? Arrowroot powder at equal measure works, though texture will differ slightly. The sugar in the egg wash can be swapped for maple syrup or agave—just reduce by 10% since they're sweeter. For a savory crust, skip the sugar entirely and use 1 tsp lemon juice + 1 tsp water instead. The ice cubes? Regular ice from your freezer is perfect—no need for specialty ice. And if you're making a lattice, use a sharp knife or pizza cutter**—it makes all the difference.
This dough needs to chill for at least 1 hour—wrap it tightly in plastic and press ice cubes against it for 10 minutes before rolling to prevent sticking. Store unused dough between layers of parchment in the fridge for up to 3 days or freeze for 3 months. Baked crusts reheat beautifully—just 5 minutes at 350°F to restore crispness. The lattice design? Cut strips 1/4-inch wide for that perfect windowpane effect. Trust me on the chilling—skipping it makes all the difference between flaky and fragile.
Why You'll Love This Recipe
- No-Fuss Mixing: I swear by the "pinch and pulse" method—just dump the rice flour, tapioca starch, salt, and olive oil in a bowl, then add cold water until it clumps. No food processor? No problem. My hands and a fork do the trick in under 5 minutes.
- Rich, Buttery Crisp: That olive oil isn’t just for flavor—it mimics butter’s richness without dairy. The tapioca starch gives it a satisfying snap, while the rice flour keeps it tender. Honestly, blindfolded, I’d guess it was classic crust.
- Allergy-Proof Any Day: Hosting a dinner party with gluten, nut, or dairy restrictions? This crust handles it all. I’ve used it for quiches, pot pies, and even savory tarts—everyone eats seconds without hesitation.
- Budget Crust Wins: A single bag of rice flour and tapioca starch lasts me months. No need for specialty flours or expensive oils—just good old EVOO and pantry staples. Leftovers? Roll them into discs, freeze, and bake later. Zero waste.
Step-by-step instructions for allergy-free pie crust
This gluten-free, dairy-free lattice crust holds its shape and delivers perfect flakiness—no compromises!
👨🍳 Step 1: Mix Dry Ingredients for Optimal Texture
In a large bowl, whisk together the 1.5 cups rice flour and 0.5 cup tapioca starch until completely combined. This blend creates the perfect balance of structure and tenderness—rice flour provides stability while tapioca starch adds that signature flaky texture. Sift the mixture through a fine-mesh sieve to aerate and eliminate any lumps, which prevents dense patches in your final crust.
Add the 0.5 tsp salt and 0.25 tsp xanthan gum to the dry ingredients. The xanthan gum acts as a gluten substitute, binding the crust together while the salt enhances flavor. Whisk again until evenly distributed. I like to press the mixture through the sieve a second time to ensure everything is perfectly homogenous—this makes all the difference in achieving a light, crisp crust.
🥘 Step 2: Combine Wet Ingredients for a Light Dough
In a separate bowl, mix the 0.5 cup extra-virgin olive oil with the 3 tbsp aquafaba and 1 tbsp granulated sugar. The aquafaba (chickpea brine) replaces eggs perfectly, adding moisture and structure. Whisk vigorously for 30 seconds until the mixture becomes slightly frothy—this incorporates air, which is crucial for a light texture.
Add the 1 tbsp ground flaxseed to the wet ingredients and stir well. The flaxseed provides that extra binding power that gluten-free crusts often lack. Pour the wet mixture into the dry ingredients and stir gently with a wooden spoon or silicone spatula until just combined. You're looking for a dough that holds together when pressed but doesn't feel sticky—if it's too dry, add 1 teaspoon of the cold water at a time until it comes together.
⏰ Step 3: Chill the Dough for Perfect Layers
Divide the dough into two equal portions and flatten each into a ¼-inch thick disk. Wrap each disk tightly in plastic wrap and place them on a plate. Now for the critical chilling step: place the plate in the freezer for 30 minutes to firm up the dough, then transfer to the refrigerator for at least 1 hour (or up to 24 hours). This resting period is non-negotiable—it allows the gluten-free ingredients to fully hydrate and prevents the crust from shrinking during baking.
I like to use the 1 cup ice cubes during this time to keep the dough cold. Place the wrapped dough disks on a tray of ice cubes in the freezer for the initial 30 minutes—this ensures even cooling throughout. The colder the dough, the better it will hold its shape when you roll it out later. Don't skip this step; it's what makes this crust stand up like traditional flaky pie crusts.
🍳 Step 4: Roll and Assemble the Lattice
Working with one disk at a time, place it between two sheets of parchment paper. Using a rolling pin, roll the dough into a 12-inch circle, keeping the thickness consistent at about ⅛-inch. If the dough cracks, gently press it back together—this is normal with gluten-free dough. The key here is to keep the edges slightly thicker than the center, which helps prevent shrinking during baking.
Transfer the rolled crust to a 9-inch pie dish, pressing gently to shape it to the bottom and sides. For the lattice, cut the second disk into ½-inch strips using a sharp knife or pizza cutter. Arrange the strips in a lattice pattern, starting with a full strip across the top, then alternating full and half strips. Press the edges gently to seal—this prevents filling from leaking out during baking. The lattice should look intricate but sturdy enough to hold its shape.
Pro Tips For Making Allergy Free Pie Crust
- Chill the Flour Mix: I learned this the hard way—when the rice flour and tapioca starch sit out, they absorb moisture from the air and turn gummy. Pop that bowl in the fridge for 10 minutes before mixing, especially if your kitchen’s humid. Trust me, your crust won’t clump like a sad science experiment.
- Use Ice Water, Not Cold: Cold water’s fine, but ice water’s non-negotiable for this crust. Toss a handful of ice cubes into your measuring cup before adding the water—it keeps the dough from softening too fast when you handle it. (Yes, even if you’re impatient like me.)
- Press, Don’t Roll: Rolling this dough with a pin is a nightmare—it sticks, tears, and frustrates you. Instead, press it into the pan with your fingers, starting from the center and working outward. It’s faster, gives better control, and avoids the "why is this falling apart?" panic.
- Rest the Dough 15 Minutes: Skip this, and your crust will shrink like a sad balloon in the oven. After mixing, let the dough sit covered while you preheat. The starches relax, and you’ll end up with a flaky, even texture—not a lumpy mess. (Your future self will thank you.)
Storing and reheating your leftovers
Fridge Storage Tips
Store your unused dough between layers of parchment paper in an airtight container or tightly wrapped with plastic wrap. Place it in the fridge for up to 3 days—this keeps it fresh without drying out.
I like to label it with the date and recipe name so I don’t forget what I’m making later. 💡
For partially baked crusts, cool them completely before storing. Once cooled, wrap them tightly in plastic wrap or place in an airtight container with a paper towel to absorb moisture. They’ll stay crisp for 2-3 days in the fridge, perfect for quick assembly later.
Freezer Prep
Freeze unused dough by wrapping it tightly in plastic wrap and then in a freezer bag to prevent freezer burn. Label it with the date—this crust keeps for up to 3 months without losing quality. When ready to use, thaw it in the fridge overnight for best results. 🧊
For pre-baked crusts, bake them fully, cool completely, then wrap tightly in plastic wrap or aluminum foil. Store in a freezer bag and freeze for up to 2 months.
Reheat at 350°F for 5-10 minutes to restore crispness—this is my go-to for holiday pies I want to prep ahead.
Reheating Baked Crusts
Reheat pre-baked crusts in a 350°F oven for 5-10 minutes until golden and crisp again. I place a small dish of water on the lower rack to add moisture and prevent drying. For lattice designs, cover loosely with foil if they brown too quickly—this keeps them looking fresh. ✨
If you’re reheating a filled pie, bake it at 350°F for 15-20 minutes until the filling is hot and the crust is crisp. Avoid microwaving—it makes the crust soggy. For best results, reheat in a preheated oven to ensure even warmth throughout.
Lattice Preservation
To keep lattice designs crisp after reheating, brush the baked crust with a light coating of olive oil before storing. This creates a barrier that locks in moisture and prevents the strips from sticking together.
I also like to sprinkle a pinch of granulated sugar on top before reheating—it caramelizes slightly, adding extra flavor. 🍯
For extra crispiness, place the reheated crust on a wire rack instead of a plate. This allows air to circulate underneath, keeping the bottom from getting soggy. If your lattice looks a little limp after reheating, pop it back in the oven for 2-3 minutes to restore its structure.
Nutrition facts
Frequently asked questions
Can I make this crust without xanthan gum?
Yes! If you don’t have xanthan gum, substitute with 0.25 tsp ground psyllium husk—it binds similarly. For extra insurance, add 1 extra tbsp ground flaxseed to the dough. The crust may be slightly less tender but will still hold together beautifully.
Will this crust work for savory dishes like quiche?
Absolutely—this crust is perfect for savory pies! Skip the sugar in the egg wash and use 1 tsp lemon juice + 1 tsp water instead. The olive oil adds richness without dairy, and the sturdy texture holds up to creamy fillings like spinach-artichoke or bacon.
Why does my gluten-free crust turn out dense?
Dense crusts usually mean the dough wasn’t chilled enough or was overworked. Always chill for at least 1 hour and handle it gently when rolling. The ice cube trick (placing dough on ice for 10 minutes before rolling) also helps prevent shrinking. Don’t skip the xanthan gum—it’s key for structure!
Can I use coconut oil instead of olive oil?
Not ideal—coconut oil has a lower smoke point and can make the crust taste soapy. Stick with extra-virgin olive oil for the best flavor and texture. If you’re avoiding olive oil, avocado oil works as a neutral alternative. Never use melted butter or dairy substitutes, as they contain allergens.
How do I prevent the crust from shrinking?
Prevent shrinking by keeping the dough cold (use ice cubes!) and rolling it evenly to ⅛-inch thickness. Press the edges gently into the pie dish before baking, and avoid overfilling—leave ½-inch headspace for juicy fillings. A pre-baked crust (blind-baked at 375°F for 15 minutes**) also helps maintain shape.