
Desserts
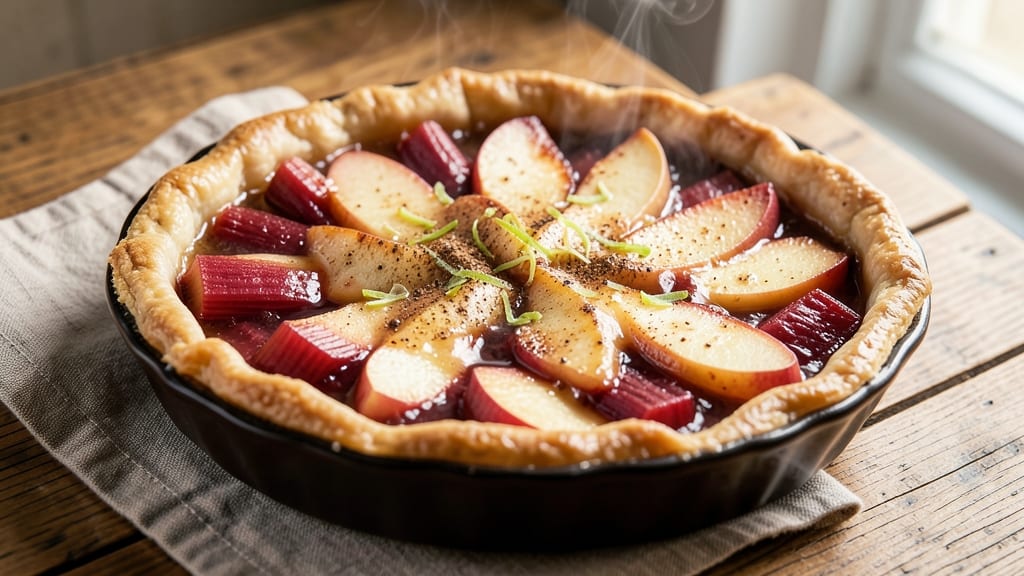
This rhubarb apple pie filling recipe delivers the perfect balance of tart rhubarb and sweet apples in a filling that's rich, bubbly, and ready for your favorite crust. The secret lies in a slow simmer that develops deep flavors while preserving texture—no mushy results here.
I've perfected this over years of baking, ensuring the filling stays thick enough to hold its shape when sliced, with just enough juiciness to keep every bite moist.
What sets this recipe apart is the technique: rhubarb and apples are cooked separately at first, allowing the rhubarb to soften without turning to mush while the apples release their natural juices.
A touch of cornstarch creates that signature pie filling thickness, and a splash of lemon juice brightens the flavors. The result is a filling that's perfect for classic lattice crusts, deep-dish pies, or even individual hand pies.
Once assembled with your crust of choice, this pie emerges from the oven with a golden, flaky exterior and a filling that's still slightly jiggly in the center—proof of that perfect tart-sweet balance.
The aroma alone will have everyone gathering around your table, and the first bite delivers layers of spiced apple and tangy rhubarb that sing together. It's the kind of dessert that feels like a hug from your favorite bakery.
Whether you're baking for a holiday gathering or treating yourself to a weekend dessert, this recipe scales beautifully and keeps well for days. The instructions cover everything from filling preparation to crust application and baking, so you'll have a showstopping pie that's sure to become a family favorite.
Let's get started on creating this classic with a modern twist.
Ingredients for rhubarb apple pie filling
Tart rhubarb meets sweet apples in this perfect pie filling—just 11 ingredients for maximum flavor.
| Ingredient | Amount | Notes |
|---|---|---|
| Fresh Rhubarb 🍓 | 2 cups | Chopped into 1-inch pieces |
| Apples 🍎 | 2 medium | Peeled, cored, sliced into 1/4-inch pieces |
| Granulated Sugar 🍚 | 1 ¼ cups | Light brown sugar for depth |
| Cornstarch 🌾 | 2 tbsp | For perfect thickening |
| Lemon Juice 🍋 | 2 tbsp | Freshly squeezed for brightness |
| Ground Cinnamon 🌿 | 1 tsp | Freshly ground preferred |
| Ground Allspice 🌶️ | ¼ tsp | For subtle warmth |
| Salt 🧂 | ¼ tsp | Kosher or sea salt |
| Unsweetened Applesauce 🍎 | ¼ cup | For moisture balance |
| Vanilla Extract 🌸 | 1 tsp | Pure vanilla for aroma |
| Butter 🧈 | 2 tbsp | Cold, cubed for richness |
The rhubarb is your star here—look for vibrant, firm stalks with no sliminess. Local farmers markets usually have the freshest, but the grocery store works too if you grab it early in the week. Apples? Honeycrisp or Granny Smith hold up best during cooking, but whatever you've got will work. The sugar is where you can play—light brown adds depth, but white works perfectly fine. I always grab the Dominican or Florida rhubarb at Whole Foods when it's in season—it's sweeter and more tender.
No rhubarb? Substitute extra apples with 1 tbsp lemon juice added to keep the tartness. Running low on applesauce? Unsweetened applesauce from a jar works, but homemade with just apples and water is ideal. The cornstarch is non-negotiable for that perfect pie filling texture—Arrowhead brand is my go-to, but any cornstarch will do. Want more spice? Add a pinch of nutmeg. The butter should be cold when you add it—cut it into small cubes and keep it in the freezer until the very end.
This filling keeps beautifully in the fridge for 5 days—just store it in an airtight container with a layer of plastic wrap pressed right on top. For longer storage, freeze it in 1-cup portions—thaw overnight in the fridge before using. The applesauce and butter can be prepped ahead, but hold off on mixing until you're ready to bake. Double the recipe—it's perfect for making ahead and freezing.
Why You'll Love This Recipe
- No Chopping Chaos: I swear by this recipe because the rhubarb and apples only need rough chopping—no fancy dicing, no peeling if you don’t want it. The lemon juice brightens everything in seconds, and the cornstarch thickens it just enough without fuss.
- Tart-Sweet Magic: That balance of rhubarb’s sharpness and apples’ gentle sweetness? It’s ridiculously good. The sugar caramelizes just enough to coat every bite, and the lemon keeps it from tasting cloying—like autumn in a bowl.
- Pie or Pudding: Use it straight from the pot as a warm filling, or let it cool for a no-bake cheesecake topping. I’ve even dumped it into yogurt bowls for a breakfast surprise. Same ingredients, endless ways to serve.
- Budget-Friendly Staples: Rhubarb’s cheap in season, apples last forever, and sugar/cornstarch are pantry basics. A single batch stretches to pies, cobblers, or even a quick sauce for pancakes—no wasted ingredients here.
Step-by-step instructions for rhubarb apple pie filling
Here's how to create the perfect tart-sweet filling that balances rhubarb's tang with apple's natural sweetness.
Prepare the Rhubarb and Apples
Start by chopping the 2 cups of fresh rhubarb into 1-inch pieces—this size ensures even cooking without turning to mush. I like to use a sharp chef's knife for clean cuts, and I trim away any leafy stems since they're bitter. Next, peel and core the 2 medium apples, then slice them into ¼-inch pieces. The smaller the slices, the quicker they'll soften and blend with the rhubarb.
Place both chopped rhubarb and apple slices in a large mixing bowl. The rhubarb will look vibrant pink, while the apples add a pale contrast. Give them a quick stir to distribute evenly—this helps the flavors meld better during cooking. Here's the thing: rhubarb is naturally tart, so the apples will balance that sharpness as they cook down.
Mix Dry Ingredients for Thickening
In a small bowl, whisk together the 1.25 cups granulated sugar, 2 tbsp cornstarch, 1 tsp ground cinnamon, ¼ tsp ground allspice, and ¼ tsp salt. The sugar will dissolve slightly as you whisk, creating a fine, even coating for the fruit. I always use light brown sugar here—it adds just enough depth to complement the tartness without overpowering it.
Sprinkle this dry mixture evenly over the rhubarb and apple slices in the mixing bowl. Use your hands to gently toss everything together until every piece of fruit is lightly dusted. This ensures the filling thickens properly and doesn't turn gluey. Don't worry if some sugar clumps remain—it'll dissolve during cooking.
Cook the Filling Until Thick and Bubbly
Transfer the fruit mixture to a 4-quart saucepan and stir in the 2 tbsp lemon juice, ¼ cup unsweetened applesauce, and 1 tsp vanilla extract. The lemon juice brightens the flavors while the applesauce adds natural moisture that prevents the filling from becoming too dry. Place the saucepan over medium-high heat and bring the mixture to a gentle boil.
Once boiling, reduce the heat to medium-low and let it simmer uncovered for 15-20 minutes, stirring occasionally. You're looking for a thick, jammy consistency where the filling coats the back of a spoon. The rhubarb will soften and turn translucent, while the apples break down into a tender puree. Here's where it gets fun—taste it at 10 minutes to check sweetness. If it's still too tart, you can add up to ¼ cup more sugar now.
Finish with Butter for Richness
When the filling reaches your desired thickness (it should be thick enough to coat a spoon but still spoonable), remove the pan from heat. Stir in the 2 tbsp cold cubed butter, letting it melt slowly into the warm filling. The butter adds a luxurious richness that balances the tart-sweet flavors. Let the mixture sit for 2-3 minutes to thicken slightly more from the residual heat.
Taste and adjust seasoning if needed—another pinch of cinnamon or a splash of lemon juice can perfect the balance. Transfer the filling to a clean bowl and let it cool to room temperature before using. This filling keeps well in the refrigerator for up to 5 days, making it perfect for prepping ahead for your pie.
Pro Tips For Making Rhubarb Apple Pie Filling
- CHOP RHUBARB STRAIGHT: Cut the stalks into ½-inch chunks—no need to peel. The skin adds texture, and peeling wastes time. I used to slice them thin, thinking it’d cook faster, but they turn mushy. Thicker pieces hold shape better.
- COOK APPLES FIRST: Dump the chopped apples into the pot with a splash of water and lemon juice. Cook them until soft (about 5 minutes) before adding rhubarb. This keeps the filling from getting watery later—rhubarb releases liquid like a faucet left running.
- STIR THE CORNSTARCH: Mix the cornstarch with sugar first, then sprinkle it over the hot filling while stirring. I learned this the hard way: lumping it in leads to gummy patches. A quick whisk with a fork does the job—no fancy tools needed.
- TEST SUGAR BALANCE: Taste the filling before baking—sweetness should hit around 20 minutes of simmering. Rhubarb’s tartness tricks you; if it’s still sour, add sugar in ¼-cup increments. No guessing: use a spoon to check, not your eye.
Essential equipment for great rhubarb apple pie filling
Essential Pie Dish
You'll need a 9-inch pie dish for that perfect single-serving pie or a 10-inch dish for a classic two-crust pie. I recommend ceramic or glass dishes—they distribute heat evenly and prevent burning.
For deep-dish pies, a 12-inch dish works beautifully, but it requires more filling. Always preheat your dish in the oven for 5-10 minutes before adding the crust to prevent cracking. 🔥
Rolling Pin & Pastry Cutter
A wooden rolling pin is my go-to for pie crusts—it gives even pressure without tearing the dough. For a lattice crust, I use a pastry wheel to cut clean strips.
If you don’t have one, a sharp knife works in a pinch, but it’s messier. A pie bird (the decorative topper) is optional but adds that bakery-style touch. 🌟
Mixing Bowls & Whisk
Use a large mixing bowl (at least 8-inch diameter) for tossing the fruit and dry ingredients. A stainless steel whisk is perfect for blending the sugar mixture smoothly. I also keep a small bowl handy for mixing the cornstarch and spices—this prevents clumps and ensures even distribution. 🥄
Measuring Tools
Precision matters! Invest in a set of measuring cups (liquid and dry) and a digital kitchen scale for accuracy with sugar and cornstarch. I use Pyrex measuring cups—they’re durable and heat-resistant. A fine-mesh strainer helps remove any tough rhubarb strings if needed. 📏
Saucepan & Heatproof Spoon
A 4-quart saucepan is ideal for cooking the filling—it gives enough room for the mixture to bubble without overflowing. A heatproof silicone spatula or wooden spoon prevents scratching the pan while stirring.
For testing thickness, I use a small plate to drop a spoonful of filling—it should wrinkle slightly when cool. ✨
Cooling Rack & Aluminum Foil
Let your pie cool on a wire cooling rack to prevent sogginess from steam. Keep a roll of aluminum foil nearby to cover edges if they brown too quickly.
A pie crust shield (a metal ring) protects the crust from over-browning while the filling sets. Trust me, it’s a game-changer for even results. 💫
Nutrition facts
Frequently asked questions
Can I use canned rhubarb instead of fresh?
Fresh rhubarb gives the best texture and flavor, but you can substitute 1 (14-oz) can of sliced rhubarb drained well for the 2 cups fresh. Drain thoroughly and pat dry with a paper towel to remove excess liquid, which could make your filling too watery. The flavor will be slightly less vibrant, but it works in a pinch. For extra tartness, add 1 extra tablespoon of lemon juice to the filling.
How do I know when the filling is thick enough?
Test for doneness by dropping a spoonful of filling onto a chilled plate. If it wrinkles slightly when cool (like a puddle), it's ready. The filling should coat the back of a spoon but still be spoonable. For a thicker texture, simmer 2-3 minutes longer—just watch closely to avoid burning. If it's too thin, stir in 1 teaspoon cornstarch mixed with 1 tablespoon water and simmer another minute.
Can I make this filling ahead of time?
This filling keeps beautifully in the fridge for 5 days in an airtight container with plastic wrap pressed directly on the surface. For longer storage, freeze it in 1-cup portions—thaw overnight in the fridge before using. The flavors actually deepen when reheated gently. To reheat, warm in a saucepan over low heat for 3-5 minutes, stirring constantly until bubbly.
What's the best way to prevent a soggy crust?
Prevent sogginess by brushing the bottom crust with egg wash (1 egg beaten with 1 tablespoon water) or applesauce before adding filling. For extra insurance, sprinkle 1/4 cup crushed cornflakes or finely chopped nuts between the crusts. Bake the pie on the lower oven rack for the first 15 minutes to crisp the bottom, then move it up. Let the pie cool for at least 2 hours before slicing—this gives the filling time to set properly.
Can I use this filling for other desserts besides pie?
Yes! This versatile filling works perfectly for hand pies (use 1/2 cup filling per pie), cobblers, or even as a topping for ice cream or pancakes. For hand pies, chill the filling for 30 minutes before assembling to prevent leaks. For cobblers, pour into a baking dish and top with 1/2 cup biscuit dough—bake at 375°F for 25-30 minutes. The filling's thickness makes it ideal for any baked dessert where you want that signature tart-sweet balance.