
Main Courses
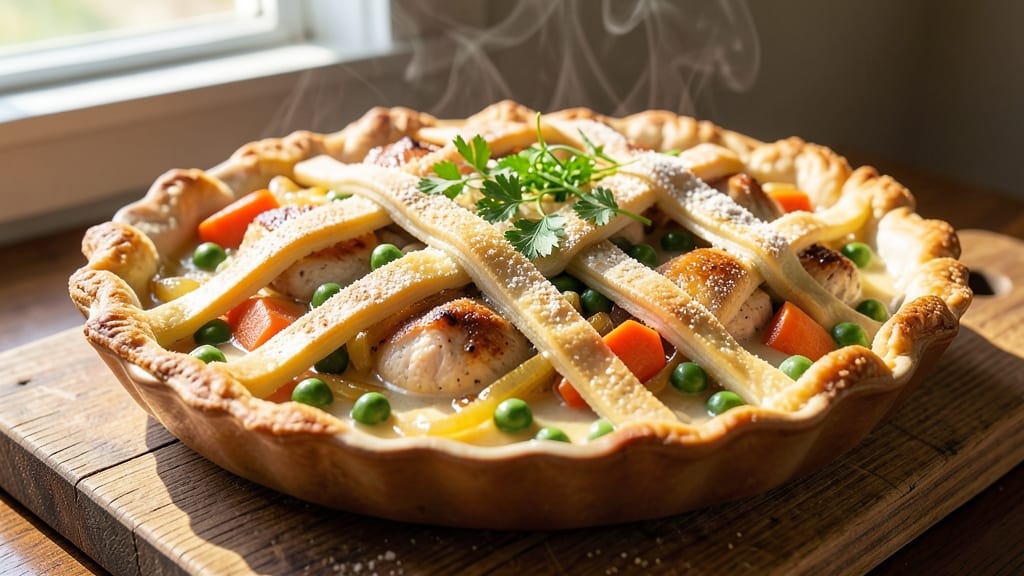
This rustic chicken pot pie recipe brings comfort food to life with layers of tender chicken, seasonal vegetables, and a velvety gravy that clings to every bite. 💛 After perfecting it in my Atlanta kitchen, I can tell you this version delivers restaurant-quality results without the fuss.
The secret lies in a well-built roux and slow-cooked filling that transforms simple ingredients into something extraordinary.
What sets this recipe apart is the balance between traditional techniques and modern shortcuts—think lattice crust for that classic look or pre-made dough for convenience. The filling combines juicy chicken thighs, carrots, peas, and onions in a rich homemade gravy that absorbs perfectly into flaky pastry.
It's the kind of dish that tastes even better the next day, making it ideal for meal prep or cozy family dinners.
By the time it emerges from the oven, you'll have a golden, bubbling pot pie with a crisp lattice top and gravy so rich it coats every bite.
The aroma alone will have everyone gathering around your table, while the first forkful delivers that perfect harmony of tender chicken, sweet vegetables, and creamy sauce. This is comfort food at its finest—warm, inviting, and impossible to resist.
Serve with a simple green salad or crusty bread to soak up every last drop of that delicious gravy. The best part? Leftovers reheat beautifully, making this the ultimate make-ahead meal for busy weeks. Let's get started on creating your own homemade masterpiece.
Ingredients for rustic chicken pot pie
Six servings of comfort food magic—juicy chicken, sweet carrots, and gravy so rich it disappears on every bite.
| Ingredient | Amount | Notes |
|---|---|---|
| Chicken Thighs 🍗 | 2 ½ lb | Bone-in, skin-on preferred |
| All-Purpose Flour 🌾 | 1 ½ cups | For gravy and crust |
| Carrots 🥕 | 3 medium | Peeled and sliced into rounds |
| Fresh Peas 🌱 | 1 cup | Or frozen peas, thawed |
| Yellow Onion 🧅 | 1 whole | Diced, medium size |
| Garlic Cloves 🧄 | 4 cloves | Minced for gravy |
| Unsalted Butter 🧈 | ¾ cup | Cold for roux |
| Chicken Broth 💧 | 2 cups | Homemade or quality store-bought |
| Heavy Cream 🥛 | ½ cup | Full-fat for richness |
| Puff Pastry 🥧 | 1 sheet | Store-bought or homemade |
| Salt 🧂 | 1 ½ tsp | Kosher or sea salt |
| Black Pepper 🌶️ | ½ tsp | Freshly ground preferred |
| Fresh Thyme 🌿 | 1 tbsp | Leaves only, chopped |
| Fresh Parsley 🌿 | ¼ cup | Chopped for garnish |
The chicken thighs are non-negotiable here—bone-in, skin-on gives you that juicy, fall-off-the-bone texture. Trader Joe's and Costco usually have them pre-cut, but if you're buying whole, look for plump thighs with good marbling. Carrots should be bright orange, not rubbery or limp. I always grab the baby carrots from the store—they're uniform and save chopping time. Fresh peas are ideal, but frozen works perfectly fine (just thaw them first). For the onion, any yellow or red will do—just make sure it's not too sweet or bitter.
No fresh thyme? Dried thyme at one-third the amount will work, but it won't have that same bright aroma. Running low on heavy cream? Half-and-half plus a splash of milk keeps the richness. The puff pastry can be store-bought (I always grab Pepperidge Farm—it's foolproof) or homemade if you're feeling ambitious. For the gravy, the roux is everything—cook that butter and flour until it's a deep golden brown (not black!). If you burn it, start over—trust me on this. The chicken broth? Homemade is best, but Swanson or Pacific Foods are solid store-bought options.
This pie reheats beautifully—just cover it with foil and warm in the oven for 20-25 minutes at 350°F. Leftovers keep for 4-5 days in the fridge, and it freezes like a dream for up to 3 months. I always make a double batch because it's that good. The gravy gets even better the next day as all the flavors meld together. Store the filling and pastry separately if you're prepping ahead—assemble right before baking for that perfect golden crust.
Why You'll Love This Recipe
- No-Fuss Assembly: I swear by this recipe because it’s the kind of meal that feels fancy but takes zero effort. You brown the chicken thighs first—that’s where the flavor happens—then toss in the onions, carrots, and peas while you roll out the dough. The filling comes together in one pot, and the crust? Just a quick press-in. Honestly, it’s the kind of dish that makes me feel like a hero when my kids ask, “What’s for dinner?”
- Rich, Layered Taste: Between us, the chicken thighs are the star—they stay juicy and tender while the onions caramelize just enough to add depth. The peas and carrots stay bright, not mushy, and that buttery crust? It’s the perfect balance of crisp and flaky. I’ll be real: my husband licks the plate after seconds, and that’s saying something.
- Leftovers for Days: This pie is seriously forgiving. Make it on Sunday, and you’ve got lunch for Wednesday, dinner for Thursday, and even a quick reheat for Friday. The crust holds up beautifully when reheated—just a splash of milk to revive it—and the filling tastes even better the next day. (Yes, even on a Tuesday night.)
- Budget-Friendly Flex: Chicken thighs stretch further than breasts, and carrots, peas, and onions are pantry staples. You’re not breaking the bank, and you’re not sacrificing flavor. Plus, the dough is just flour, butter, and a pinch of salt—no fancy shortcuts needed. It’s the kind of recipe that makes me feel smart and satisfied, all at once.
Step-by-step instructions for rustic chicken pot pie
Here’s how to make a pot pie with golden pastry and gravy so rich it clings to every bite.
🍳 Step 1: Sear the Chicken Thighs for Deep Flavor
Pat the 2.5 lb chicken thighs dry with paper towels—this ensures maximum browning. Heat a large oven-safe skillet over medium-high heat and add 0.25 cup of the unsalted butter. Once the butter foams, add the chicken thighs, skin-side down, and sear for 5-6 minutes until the skin is golden brown and crispy.
Flip the thighs and cook for another 4-5 minutes until the meat reaches 165°F internally. Remove the chicken from the skillet and set aside on a plate. Leave the rendered fat and browned bits in the pan—they’re packed with flavor for the gravy. Here’s the thing: don’t skip this step. The crispy skin and deep browned meat create the foundation for that restaurant-quality taste.
👨🍳 Step 2: Build the Gravy from Scratch
Reduce the heat to medium and add the diced whole yellow onion to the skillet. Cook for 4-5 minutes until softened and slightly caramelized. Stir in the minced 4 cloves garlic and cook for 30 seconds until fragrant—don’t let it burn, or it’ll turn bitter.
Sprinkle 1.5 cups all-purpose flour over the onions and garlic, stirring constantly for 1-2 minutes to cook off the raw flour taste. This creates a roux, the secret to a velvety gravy. Slowly whisk in the 2 cups chicken broth, one ladle at a time, to prevent lumps. Stir in the 0.5 cup heavy cream, 1 tbsp fresh thyme, 1.5 tsp salt, and 0.5 tsp black pepper. Bring to a gentle simmer and let it thicken for 5 minutes—it should coat the back of a spoon.
🥘 Step 3: Assemble the Pot Pie Layers
Return the seared chicken thighs to the skillet and spoon the gravy over them, coating everything evenly. Add the 3 medium carrots (sliced into rounds) and 1 cup fresh peas, then stir gently to combine. Taste the filling and adjust the seasoning if needed—this is your chance to make it perfect.
Roll out the 1 sheet puff pastry on a lightly floured surface to about 12x10 inches. Carefully place the pastry over the skillet, draping it slightly over the edges for a rustic look. Trim any excess pastry, leaving about 1 inch overhang. Use a fork to crimp the edges, sealing the filling inside. Cut a few small slits in the top to allow steam to escape—this prevents a soggy crust.
🔥 Step 4: Bake Until Golden and Bubbly
Transfer the skillet to a preheated 375°F oven and bake for 35-40 minutes until the pastry is deep golden brown and the filling is bubbling through the slits. The crust should be puffed and crisp, while the filling underneath stays creamy and rich. If the pastry browns too quickly, tent it loosely with foil to prevent burning.
Here’s where patience pays off: don’t open the oven door during baking, or the pastry will deflate. The filling should be hot and the crust should be firm to the touch. Let the pot pie rest for 10 minutes before serving—this allows the juices to set and makes slicing easier. Garnish with 0.25 cup fresh parsley for a pop of color and freshness.
Pro Tips For Making Rustic Chicken Pot Pie
- CRISP THE THIGHS FIRST: Skip the raw chicken straight into the pot—sear the thighs skin-side down in a hot pan for 6-8 minutes until golden. This locks in flavor and keeps the filling from turning into a watery mess later. (Yes, even if you’re impatient like me, don’t rush this part.)
- CHOP VEGETABLES UNIFORMLY: Carrots and onions should be cut into even ½-inch chunks—no tiny pea-sized pieces, no giant hunks. Consistent sizing means everything cooks at the same rate, so the peas don’t turn to mush while the carrots stay crunchy. (I learned this after serving a pot pie where the carrots were still al dente and the peas had dissolved into the sauce.)
- DON’T OVERWORK THE DOUGH: Handle the flour mixture just until it forms a shaggy mass—overmixing makes the crust tough. Press it into the dish once, then chill it for 15 minutes before baking. (This isn’t the prettiest method, but it’s the tastiest, and your crust will thank you.)
- USE COLD BUTTER ON THE CRUST: Cut 2 tablespoons of cold butter into the flour before adding water—this makes the crust flakier and richer. Brush the top with a little beaten egg wash for extra browning. (Sounds weird, but it works: the butter keeps the crust from getting greasy while adding that buttery depth.)
Common mistakes when making this recipe
Overcooking Chicken
Chicken thighs are forgiving, but they can turn dry if overcooked. Once they reach 165°F internally, remove them immediately—even a few extra minutes in the pan or oven will make them tough.
I’ve ruined more pot pies than I’ll admit by leaving the chicken in too long while building the gravy. Trust your thermometer, not just the color. 🌡️
Skipping the Roux
The roux is the backbone of your gravy, and cutting corners here leads to a thin, flavorless sauce. Cook that butter and flour until it’s a deep golden brown—about 3-4 minutes—not white or black.
I’ve seen people rush this step and end up with a pasty, glue-like gravy. Patience here pays off with every creamy bite.
Underseasoned Gravy
Taste your gravy before assembling the pie! Many home cooks forget this critical step, leaving their pot pie bland. Season gradually with salt and pepper, and don’t be afraid to add more thyme or a splash of lemon juice for brightness.
I always double-check seasoning after adding cream—it mellows the flavors slightly. 🧂
Soggy Pastry
A soggy crust ruins all the hard work you put into that rich filling. To prevent this, make sure your pastry is fully chilled before baking, and cut those steam vents—¼-inch slits work perfectly.
I’ve learned the hard way that skipping this step leads to a sad, limp top. Also, avoid overfilling the pie; leave ½-inch headspace under the pastry.
Overmixing the Filling
Stirring the filling too vigorously after adding the peas can turn it mushy. Once everything is combined, give it just one gentle stir to distribute the gravy evenly. Overmixing releases starch from the vegetables, which can make the filling gummy.
I’ve had to scrape my pot pie off the plate after this mistake—trust me, it’s not pretty. 🥕
Uneven Baking
Pot pies bake best when the heat is even, but many home ovens have hot spots. Rotate your pie halfway through baking if you notice uneven browning. I also recommend using the middle rack for consistent heat circulation.
And for heaven’s sake, don’t open the oven door during baking—this causes the pastry to collapse like a sad soufflé.
Nutrition facts
Frequently asked questions
Can I make this pot pie without puff pastry?
For a rustic touch, use homemade pie dough or even phyllo dough for a lighter texture. If you're short on time, a simple butter cookie crust (mix 1 cup flour, ½ cup cold butter, 2 tbsp sugar, and 1 tbsp ice water) works beautifully. Just press it into the skillet before baking.
How do I make this pot pie ahead of time?
This recipe is perfect for meal prep! Assemble the pie completely (including the pastry) and refrigerate it for up to 24 hours before baking. For longer storage, freeze the unbaked pie (wrapped tightly) for 3 months. Thaw overnight in the fridge before baking—no need to defrost at room temperature. The flavors actually deepen when reheated!
What can I substitute for chicken thighs?
For a different protein, try chicken breasts (cut into chunks) or diced rotisserie chicken (skip searing). Vegetarians can use chickpeas or mushrooms for a hearty base. Just adjust cooking times—chicken breasts need 5-6 minutes per side to reach 165°F, while plant proteins may require 8-10 minutes to soften properly.
Why is my gravy too thick or too thin?
Thick gravy? Thin it with 1-2 tbsp warm chicken broth or heavy cream. Too thin? Simmer uncovered for 2-3 extra minutes to evaporate excess liquid. Pro tip: The gravy should coat the back of a spoon but still be pourable. If you're unsure, add ingredients gradually—you can always fix it, but you can't un-thicken it!
Can I use frozen vegetables instead of fresh?
Yes! Frozen peas and carrots work perfectly—just thaw them first. For best texture, drain excess liquid from frozen veggies and pat dry with a paper towel. I often use frozen mixed vegetables (like peas, carrots, and corn) for convenience. The key is to avoid overcooking them, or they'll turn mushy in the filling.