
Desserts
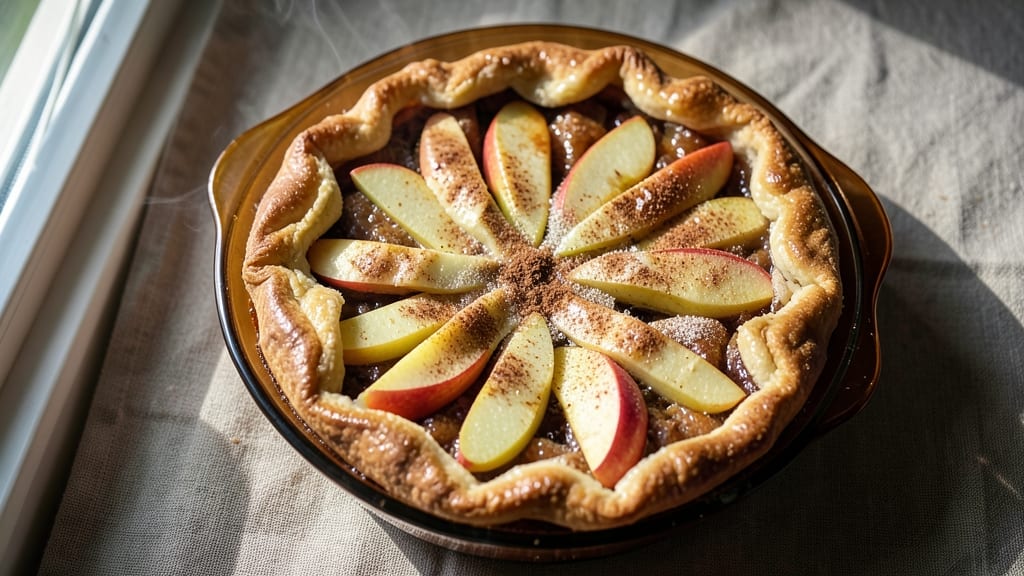
This 13x9 apple pie recipe delivers the kind of warm, spiced-perfect slices that taste like autumn in every bite.
The secret lies in a foolproof crust—whether you use homemade or store-bought—and a filling that balances tart apples with just the right amount of cinnamon, sugar, and cornstarch for that signature thick, bubbly texture.
I’ve baked this pie dozens of times, and it’s the one recipe that never disappoints, even when guests ask for seconds.
The crust gets pre-baked to golden perfection before filling, ensuring it stays crispy while the apples soften just enough to release their natural juices. A lattice top adds rustic charm and keeps the filling tender, but a simple full crust works just as well.
The filling itself is where the magic happens: a mix of Granny Smith and Honeycrisp apples (or your favorites) tossed with warm spices and a touch of lemon to brighten the flavor.
It’s the kind of pie that tastes even better the next day, when the crust has had time to firm up.
Baking at 375°F for 50-60 minutes gives you a pie with a caramelized top and flaky edges, while the filling stays thick enough to hold a spoon. The aroma alone—warm cinnamon, buttery crust, and caramelizing fruit—will have everyone gathering in the kitchen.
Serve it warm with a scoop of vanilla ice cream or whipped cream, and you’ve got a dessert that feels like a hug.
This recipe scales perfectly for holidays or potlucks, and the 13x9 pan makes it easy to slice into generous portions. Whether you’re a first-time baker or a seasoned pro, the steps are clear and the results are always impressive. Let’s get baking!
Ingredients for 13x9 apple pie
These ingredients deliver that perfect balance of crisp crust and spiced apple filling every time.
| Ingredient | Amount | Notes |
|---|---|---|
| Granny Smith Apples 🍎 | 4 medium | Peeled and sliced into 1/4-inch pieces |
| Honeycrisp Apples 🍎 | 4 medium | Peeled and sliced into 1/4-inch pieces |
| All-Purpose Flour 🌾 | 3 ½ cups | For homemade crust (or 1 pre-made crust) |
| Unsalted Butter 🧈 | 1 ½ cups | Cold, cubed for crust |
| Granulated Sugar 🍚 | 1 ½ cups | For filling (plus extra for sprinkling) |
| Light Brown Sugar 🍚 | ½ cup | Packed for filling |
| Ground Cinnamon 🌿 | 2 tbsp | Freshly ground preferred |
| Cornstarch 🍚 | ¼ cup | For thickening filling |
| Lemon Juice 🍋 | 2 tbsp | Freshly squeezed |
| Salt 🧂 | ½ tsp | Fine sea salt |
| Ice Water 💧 | ½ cup | For crust dough |
| Vanilla Extract 🌸 | 1 tsp | Pure vanilla for filling |
The apples are non-negotiable—Granny Smith for tartness and Honeycrisp for sweetness. Local orchards or grocery store bins usually have the freshest, but avoid those with bruises. For the crust, King Arthur flour or whatever all-purpose you trust works best. The butter should be cold—pull it from the fridge 30 minutes before mixing—so it creates those perfect flakes. If you're short on time, a pre-made crust from Whole Foods saves hours, though nothing beats homemade for that buttery aroma.
No Granny Smiths? Fuji or Braeburn apples hold up well too. Short on vanilla? Almond extract at half the amount works in a pinch. The cornstarch is key for that thick, spoonable filling—don't skip it. For the crust, if you don't have ice water, add 1 tbsp of cold water and let the dough rest 10 minutes. The lattice top? Use store-bought pie crust strips if cutting your own feels like too much work. And yes, you can make the filling a day ahead—it just tastes better when everything's fresh.
Store the crust dough between parchment paper in the fridge for up to 2 days. The filling keeps in the fridge for 1 day before baking, but it's best fresh. Baked pie stays perfect for 3-4 days at room temperature or 1 week refrigerated. Freeze slices wrapped in plastic for up to 3 months—just reheat in the oven for 10 minutes to restore that golden crust. I always make an extra crust for apple hand pies if I have leftovers.
Why You'll Love This Recipe
- No-Fuss Filling: I swear by the combo of Granny Smiths and Honeycrisp—one keeps it tart, the other adds that juicy sweetness. Just peel, slice, and toss them in with a sprinkle of sugar while you roll out the crust. No fancy lattice, no stress.
- Butter-Crust Bliss: That all-butter crust? It’s worth every flaky layer. I melt a little extra butter into the sugar for the filling, and suddenly you’ve got this perfect balance—crisp edges, tender apples, and a golden crust that doesn’t need a fancy show.
- Weeknight Workhorse: Between us, this is my go-to for potlucks, school fundraisers, or just because. It’s big enough to feed a crowd but easy enough to halve if it’s just me and my kids. Honestly, I’ve even reheated slices for breakfast—yes, really.
- Leftovers That Don’t Suck: No sad, soggy slices here. The crust stays crisp, the apples hold their shape, and it reheats like a dream. I’ll make one on Sunday and have pie for days—no one even complains when I freeze half for later.
Step-by-step instructions for warm spice-perfect apple pie
Here's how to assemble a classic 13x9 apple pie with a flaky crust and spiced filling that stays juicy slice after slice.
Prepare the Classic Apple Filling
In a large mixing bowl, combine the peeled and sliced 4 medium Granny Smith Apples and 4 medium Honeycrisp Apples. The tart Granny Smith balances the sweet Honeycrisp for perfect flavor harmony. Add 1.5 cups Granulated Sugar, 0.5 cup Light Brown Sugar, 2 tbsp Ground Cinnamon, 0.25 cup Cornstarch, 2 tbsp Lemon Juice, 0.5 tsp Salt, and 1 tsp Vanilla Extract. Toss gently with your hands until every apple slice is evenly coated.
Let the filling sit for 15 minutes while you prepare the crust. This resting time allows the juices to release slightly, which prevents a soggy bottom. The cornstarch will begin to absorb some moisture, ensuring your filling stays thick and saucy rather than watery during baking.
Make the Homemade Crust
In a food processor, pulse the 1.5 cups Unsalted Butter (cold and cubed) with 3.5 cups All-Purpose Flour and 0.5 tsp Salt until the mixture resembles coarse crumbs with pea-sized butter pieces. Add 0.5 cup Ice Water, one tablespoon at a time, pulsing after each addition until the dough just comes together when pressed.
Turn the dough onto a lightly floured surface and divide it into two equal discs. Wrap each disc tightly in plastic wrap and refrigerate for at least 30 minutes. Chilling firms up the butter, which prevents the crust from shrinking during baking. For a shortcut, you can use 1 pre-made crust instead of making it from scratch.
Assemble the Pie in the Pan
Preheat your oven to 375°F. Roll out one of the chilled dough discs on a floured surface until it's about 1/8-inch thick. Transfer it to a 13x9-inch baking dish, pressing gently to fit the bottom and sides. Trim any excess dough hanging over the edges with a sharp knife.
Spoon the prepared apple filling into the crust, spreading it evenly into a single layer. The filling should be about 3/4-inch thick—don't pack it down tightly. Sprinkle an additional 2 tablespoons Granulated Sugar over the top for extra caramelization. Roll out the second dough disc and place it over the filling, sealing the edges by crimping with a fork or your fingers.
Bake to Golden Perfection
Cut a few small slits in the top crust to allow steam to escape. Place the pie on a baking sheet (to catch any drips) and bake for 50-60 minutes until the crust is deep golden brown and the filling is bubbling through the slits. The edges should be set, and the filling should be thick enough to hold its shape when gently shaken.
For the best results, I recommend baking the pie on the middle rack of your oven. This ensures even heat distribution and prevents the bottom crust from becoming too crispy or the top from browning too quickly. If the crust starts browning too fast, loosely cover it with aluminum foil.
Cool and Serve
Remove the pie from the oven and let it cool for at least 2 hours before slicing. This resting period allows the filling to set slightly, making it easier to cut clean slices. The pie will continue to release its warm, spiced apple aroma as it cools—trust me, the wait is worth it.
Serve warm with a scoop of vanilla ice cream or a dollop of whipped cream. Each slice should have a flaky, buttery crust and a perfectly balanced filling that's tender yet holds its shape. The combination of tart and sweet apples, warm spices, and that buttery crust makes this the ultimate apple pie experience.
Pro Tips For Making 13x9 Apple Pie
- Preheat That Pan: Preheat your 13x9 baking dish with the pie weights (or dried beans) for 10 minutes before adding the crust—this guarantees a crisp bottom that won’t turn soggy when the apples release juice.
- Peel and Dice Apples Evenly: Use a mandoline for consistent ¼-inch slices, and toss them in lemon juice immediately to prevent browning—uneven cooking leads to mushy spots in the center while edges overcook.
- Don’t Overmix the Crust: Cut cold butter into flour with a pastry cutter until pea-sized lumps remain, then handle dough minimally when rolling—overworking it makes the crust tough, and nobody wants a 13x9 pie that’s more work than it’s worth.
- Use a Mix of Apples: Granny Smiths hold shape better than Honeycrisp, so layer them in alternating rows (tart on bottom, sweet on top) for even texture—Honeycrisp alone turns to mush faster in a deep pan.
Best sauces and condiments for this recipe
Classic Vanilla Ice Cream
Nothing beats this pie with a scoop of homemade vanilla ice cream—the creamy coldness cuts through the warm spices beautifully. I use Blue Bell Homemade Vanilla or Ben & Jerry's Phish Food for that nostalgic flavor.
For a lighter option, try Häagen-Dazs Vanilla Bean with its rich, swirled texture. The contrast of cold and warm makes every bite magical. 🍦
Caramel Drizzle
Add a homemade caramel drizzle for extra decadence. Heat 1 cup granulated sugar in a saucepan until melted, then slowly whisk in ½ cup heavy cream and ½ cup unsalted butter.
Simmer for 5 minutes until thickened, then drizzle over warm slices. Store-bought caramel sauce like Smucker's works in a pinch. 🍯
Whipped Cream Topping
Freshly whipped heavy cream with a pinch of ground cinnamon adds lightness and warmth. Whip 1 cup heavy cream with 1 tbsp powdered sugar and ½ tsp cinnamon until soft peaks form.
Dollop generously on each slice for a cloud-like finish. For extra flair, dust with powdered sugar or crushed graham crackers. ✨
Spiced Whipped Cream
Take it up a notch with spiced whipped cream. Mix ½ tsp vanilla extract, ¼ tsp cinnamon, and a pinch of ground nutmeg into the whipped cream before topping.
The warm spices echo the pie’s filling, creating a cohesive flavor experience. This is my go-to for Thanksgiving gatherings. 🌟
Apple Cider Glaze
For a tangy twist, brush slices with a warm apple cider glaze. Simmer ½ cup apple cider with 2 tbsp brown sugar and 1 tsp lemon juice for 5 minutes, then strain and drizzle.
The glaze adds a bright, autumnal note that pairs perfectly with the pie’s richness. 🍎
Nutty Crunch Topping
Add texture with a toasted nut topping. Pulse ½ cup chopped pecans or walnuts with 1 tbsp brown sugar and ½ tsp cinnamon in a food processor, then toast in a dry pan for 3-4 minutes until golden. Sprinkle over slices for a satisfying crunch. 🌰
Nutrition facts
Frequently asked questions
Can I use a different type of apple for this recipe?
While Granny Smith and Honeycrisp work perfectly, you can substitute with Fuji, Braeburn, or Pink Lady apples. Avoid overly soft varieties like McIntosh as they break down too much during baking. Mixing tart and sweet apples (like Granny Smith + Gala) keeps the filling balanced.
Why does my crust get soggy on the bottom?
Soggy crusts happen when steam from the filling doesn't escape properly. Always pre-bake the bottom crust for 8-10 minutes at 375°F before adding filling, and cut small slits in the top crust. Using cornstarch in the filling helps absorb excess moisture too. For extra insurance, sprinkle crushed cornflakes between crust layers.
Can I make this pie ahead of time?
Yes! Assemble the pie (unbaked) and refrigerate for up to 24 hours before baking. For best results, bake it 1-2 hours before serving so the filling sets properly. Store baked pie at room temperature for 3-4 days or refrigerate for 1 week. Freeze slices wrapped tightly for up to 3 months—reheat in the oven for 10 minutes to restore crispness.
How do I make a lattice crust instead of a full top?
Roll out the second dough disc and cut it into 1/2-inch strips, leaving some strips whole for structure. Arrange strips in a herringbone pattern over the filling, alternating perpendicular strips. Press edges gently to seal. The lattice creates beautiful windows while keeping the filling tender. Use store-bought pie crust strips for an easy shortcut!
What's the secret to extra flaky crust?
Keep your butter cold and work quickly to avoid warming it. Use ice water (not cold tap) and pulse just until dough forms—overmixing makes tough crust. Let the dough rest 30 minutes before rolling. For extra flakiness, freeze the dough discs for 20 minutes before rolling. The secret? Less handling = more layers!