
Desserts
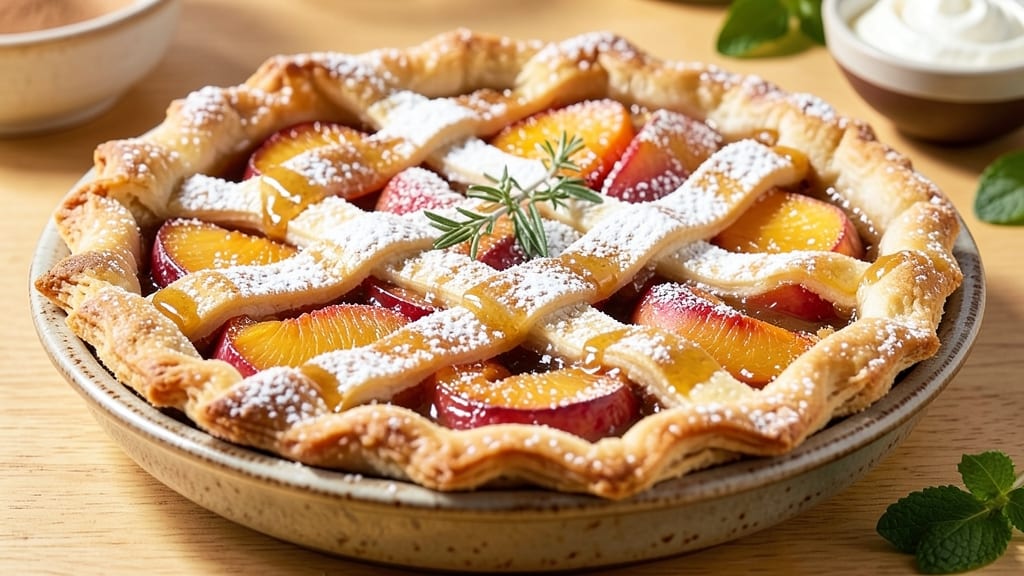
This 6-inch peach pie recipe delivers the perfect balance of flaky crust and juicy, spiced peaches in a portable, single-serving size. 💛 The secret lies in a buttery, lattice-topped crust that stays crisp while encasing tender fruit—ideal for picnics, potlucks, or a sweet treat without the mess of a full-size pie.
I’ve tested this recipe countless times to ensure it bakes evenly in a 6-inch pan, with a golden crust and filling that’s just sweet enough to satisfy without overwhelming.
The crust starts with a simple, all-butter dough that gets chilled for easy rolling, while the filling combines ripe peaches with a touch of cinnamon, brown sugar, and cornstarch to thicken just enough. A lattice crust adds visual appeal and ensures every bite includes both fruit and crust.
Baking at the right temperature—375°F—guarantees a tender, not soggy, filling with a caramelized edge that’s impossible to resist.
What makes this recipe truly special is its versatility. Serve it warm with a scoop of vanilla ice cream or whipped cream for a classic dessert, or enjoy it at room temperature for a picnic-friendly treat.
The 6-inch size makes it perfect for sharing, meal prep, or even as a make-ahead dessert for gatherings. The crust stays crisp, the peaches remain juicy, and the proportions are just right for one person—or two, if you’re generous.
For best results, use ripe but firm peaches (they’ll hold their shape better) and don’t skip the cornstarch in the filling—it’s the key to that perfect balance between juicy and thick.
Whether you’re baking for a special occasion or just craving a slice of summer, this pie delivers restaurant-quality results in a fraction of the time and effort. Let’s get baking!
Ingredients for 6 inch peach pie
Buttery crust, spiced peaches, and perfect proportions—everything you need for these irresistible mini pies.
| Ingredient | Amount | Notes |
|---|---|---|
| All-Purpose Flour 🌾 | 2 ¼ cups | Sifted for light texture |
| Unsalted Butter 🧈 | ¾ cup | Cold, cubed for pastry |
| Granulated Sugar 🍚 | ½ cup | For crust and filling |
| Brown Sugar 🍚 | ¼ cup | Packed for caramel depth |
| Ripe Peaches 🍑 | 2 cups | Pitted, sliced (about 3 medium) |
| Cornstarch 🌾 | 2 tbsp | Thickens filling perfectly |
| Ground Cinnamon 🌿 | 1 ½ tsp | Freshly ground preferred |
| Salt 🧂 | ½ tsp | Kosher or sea salt |
| Vanilla Extract 💧 | ½ tsp | Pure vanilla preferred |
| Lemon Juice 🍋 | 1 tbsp | Brightens peaches |
| Ice Water 💧 | ¼ cup | For pie dough |
| Heavy Cream 🥛 | ¼ cup | For lattice brushing |
The peaches are non-negotiable here—ripe but firm is key. Hit up Trader Joe's or local farmers markets in summer for the best flavor. If you can't find fresh, canned peaches in juice (drained and patted dry) work in a pinch. For the butter? Plugrá or Land O'Lakes unsalted are my go-tos—they stay firm when chilled. Sift that flour, don't just scoop it, or you'll end up with a dense crust. And trust me on the cornstarch—it's what keeps that filling from turning into a puddle.
No vanilla extract? Vanilla bean paste or a scraped vanilla bean gives you that same depth. Running short on peaches? Plums or nectarines work beautifully—they just need a touch more sugar. The lattice pattern might look fancy, but it's just strips of dough cut into thirds and stacked. Use a pizza cutter for clean lines. For the crust, if you're not feeling fancy, just roll it out and cut circles—no lattice needed. The brown sugar? Light or dark doesn't matter here, but packed means no scooping—use your hands to press it down.
Peaches keep best in the fridge for 2-3 days once sliced, so prep ahead if you can. The dough can be made 2 days in advance and stored wrapped in plastic. Baked pies stay fresh for 3 days at room temperature or 1 week in the fridge. Freeze unbaked pies for 2 months—just add 10 minutes to baking time. The lattice? Brush with melted butter or heavy cream before baking for that golden finish. And save those peach pits—they make amazing jam!
Why You'll Love This Recipe
- No-Roll Crust Magic: I swear by this butter-and-flour shortcut—just mix, press, bake. No chilling, no fuss, and the flaky layers still happen. My hands stay clean, and the pie crust turns out golden every time.
- Peach Caramel Bliss: That brown sugar swirl in the filling? It’s the secret weapon. The peaches soften into syrup while the edges stay just set—like biting into summer in a flaky hug. Honestly, the first slice makes me pause mid-bite.
- Picnic or Potluck Star: Six inches is the perfect size—light enough to pack, shareable enough for gatherings. I’ve taken slices to brunch, tossed one in a lunchbox, and even served it warm with vanilla ice cream at summer dinners. It’s the crowd-pleaser that never disappoints.
- Leftovers That Last: This pie stays fresh for days (if it lasts that long). The crust doesn’t get soggy, and the filling keeps its balance of sweet and tart. Between us, I’ve reheated slices in the oven for breakfast the next morning—trust me, it’s a thing.
Step-by-step instructions for 6-Inch peach pie
Here's how to create a golden, flaky crust and luscious peach filling that'll make your picnic the talk of the summer.
👨🍳 Step 1: Make the Perfect Pie Crust
In a large bowl, combine the 2.25 cups all-purpose flour and 0.5 tsp salt. Cut in the 0.75 cup cold cubed unsalted butter using a pastry cutter or your fingers until the mixture resembles coarse crumbs with pea-sized butter pieces. This texture is key for flaky layers.
Add 0.25 cup ice water and gently mix with a fork until just combined. The dough should hold together when pressed but not be sticky. Divide the dough into two equal discs, flatten into 6-inch circles, wrap in plastic, and chill for 30 minutes. Chilling prevents shrinking and makes rolling easier.
🍳 Step 2: Prepare the Peach Filling
In a medium bowl, combine the 2 cups ripe peaches, 0.5 cup granulated sugar, 0.25 cup brown sugar, 2 tbsp cornstarch, 1.5 tsp ground cinnamon, 0.5 tsp vanilla extract, and 1 tbsp lemon juice. Toss gently until the peaches are evenly coated with the sugar mixture. Let sit for 10 minutes to soften slightly.
Real talk: don't skip the lemon juice. It brightens the peaches and prevents the filling from tasting flat. The sugar will caramelize beautifully during baking, creating that perfect balance of sweet and tangy.
🥘 Step 3: Assemble the Mini Pie
Roll out one pie dough disc to fit a 6-inch pie pan, leaving a 1-inch overhang. Press gently into the pan and trim the edges, leaving about ½-inch extra dough. Roll out the second dough disc to cut a lattice pattern using a knife or pie cutter. Chill both dough pieces while you preheat your oven to 375°F.
Arrange the peach mixture evenly in the pie crust, mounding slightly in the center. Brush the edges with 0.25 cup heavy cream to create a seal. This prevents the filling from bubbling over during baking. Dot the top with the remaining cream for extra richness.
🔥 Step 4: Bake to Golden Perfection
Place the pie on a parchment-lined baking sheet to catch any drips. Bake for 35-40 minutes until the crust is golden brown and the filling is bubbling gently. The edges should be set but still slightly soft to the touch.
Here's the thing—your oven might run hot, so start checking at the 30-minute mark. If the crust browns too quickly, tent loosely with foil. For the perfect finish, brush the lattice with more cream and broil for 1-2 minutes until golden and bubbly.
⏰ Step 5: Cool and Serve
Let the pie cool completely on a wire rack for at least 2 hours before slicing. This resting time allows the filling to set properly and prevents a soggy bottom. The contrast between the crisp crust and warm peaches is what makes this pie truly special.
Slice into perfect wedges and serve with a dollop of whipped cream or a scoop of vanilla ice cream. Each bite should deliver that perfect balance of flaky crust, juicy peaches, and spiced filling that'll have everyone asking for your recipe.
Pro Tips For Making 6 Inch Peach Pie
- STEAM THE PEACHES FIRST: Toss halved peaches in a pot with 2 tablespoons sugar and 1 cup water, then simmer 8–10 minutes until just soft—not mushy. This keeps them from turning to peach soup in the pie. (Yes, I’ve seen it happen.)
- CHILL THE DOUGH LONGER: Wrap the crust in plastic and refrigerate it overnight if possible—even 4 hours helps. Cold butter in the dough means flakier layers, and a firmer crust holds shape better when you’re working with a small 6-inch pan.
- SKIP THE BROWN SUGAR IN FILLING: Brown sugar caramelizes faster and can burn before the peaches are done. Stick to granulated sugar in the filling, then sprinkle a pinch of cinnamon or a drizzle of honey on top after baking for depth without the risk.
- VENT THE TOP CRUST: Cut a 2-inch sliver out of the top crust before baking—don’t just poke holes. A proper vent lets steam escape without letting filling ooze out. (I used to poke holes; now I just cut a neat little door.)
Common mistakes when making perfect results
Overfilling the Pie
This is my biggest rookie mistake when baking mini pies—overestimating how much filling a 6-inch pan can hold. The crust can only handle about 1 cup of filling max, or it'll puff up like a volcano during baking.
I learned this the hard way when my first attempt had peach filling oozing over the edges. For this recipe, stick to the 2 cups peaches called for—they'll reduce and thicken during baking, leaving you with that perfect 1-inch-thick filling layer. 🌋
Skipping the Chill
I can't stress this enough: never skip chilling the dough. The butter needs time to firm up, or your crust will turn out greasy and tough.
When I first tried this recipe, I rushed ahead and ended up with a crust that looked more like a biscuit than flaky layers. Always chill the dough for at least 30 minutes before rolling, and keep the lattice strips chilled while you assemble.
Trust me, the extra wait time is worth it. ❄️
Underestimating Baking Time
Mini pies bake faster than their full-size counterparts, but that doesn't mean you can set them and forget them. I've caught many pies burning because I walked away for just 5 minutes. Set a timer for 30 minutes and check frequently after that.
The filling should be bubbling gently and the crust golden brown. If the edges brown too quickly, tent with foil and let the center cook through. 🕒
Using Underripe Peaches
Nothing ruins a peach pie faster than using peaches that aren't ripe enough. They'll turn out hard and mealy instead of juicy and tender. I once used slightly green peaches because I thought they'd soften in the oven, but they just sat there like little rocks.
For this recipe, your peaches should be ripe but still firm—press gently, and they should yield slightly but not be mushy. If you're using canned peaches, drain them well and pat dry to avoid a watery filling. 🍑
Forgetting the Egg Wash
While this recipe doesn't call for an egg wash (we're using heavy cream for brushing), I've seen many home bakers skip the edge sealing entirely. That ¼ cup heavy cream brushed on the edges creates a seal that prevents filling from bubbling over during baking.
Without it, you might end up with a messy pie that looks more like a science experiment than dessert. Don't skip this crucial step—it's what keeps your mini pie looking professional. 🎨
Cutting the Lattice Too Thin
The lattice isn't just for looks—it needs to be sturdy enough to support the filling while baking. I've made the mistake of cutting strips that were too thin, and they'd either collapse or burn before the pie was done.
For this recipe, cut your dough strips about ¼-inch wide and stack them carefully. If they look too flimsy, chill them for another 10 minutes before placing on the pie. The lattice should provide structure, not just decoration. 🧩
Nutrition facts
Frequently asked questions
Can I use frozen peaches instead of fresh?
Yes! Just thaw the frozen peaches completely and drain any excess liquid before using. For best results, pat them very dry with paper towels to prevent a watery filling. You may need to add an extra ½ teaspoon cornstarch to compensate for the moisture difference.
How do I make this pie gluten-free?
Replace the all-purpose flour with a 1:1 gluten-free baking flour blend (like Bob's Red Mill) and add ½ teaspoon xanthan gum to improve texture. For the crust, use a gluten-free pie crust recipe or a store-bought gluten-free crust. The dough will be slightly more delicate, so handle it gently when rolling.
Can I bake these pies ahead of time?
Bake the pies up to 3 days in advance and store them at room temperature in an airtight container. For longer storage, refrigerate for up to 1 week or freeze unbaked pies for 2 months. Reheat frozen pies at 350°F for 15-20 minutes to restore freshness.
What if I don't have a 6-inch pie pan?
Use a 6-inch tart pan or even a small ceramic pie dish. If you're using a round cake pan, reduce the filling to 1 cup to prevent overflow. For a rustic look, try baking in individual ramekins—just reduce baking time by 5-10 minutes since they heat up faster.
How can I make the crust extra flaky?
Chill the dough longer (1 hour instead of 30 minutes) and cut in more cold butter for a richer texture. For extra flakiness, fold the dough in half and roll it out again after the initial chill. Also, avoid overworking the dough—just mix until it comes together. The secret is in the cold butter and minimal handling!