
Desserts
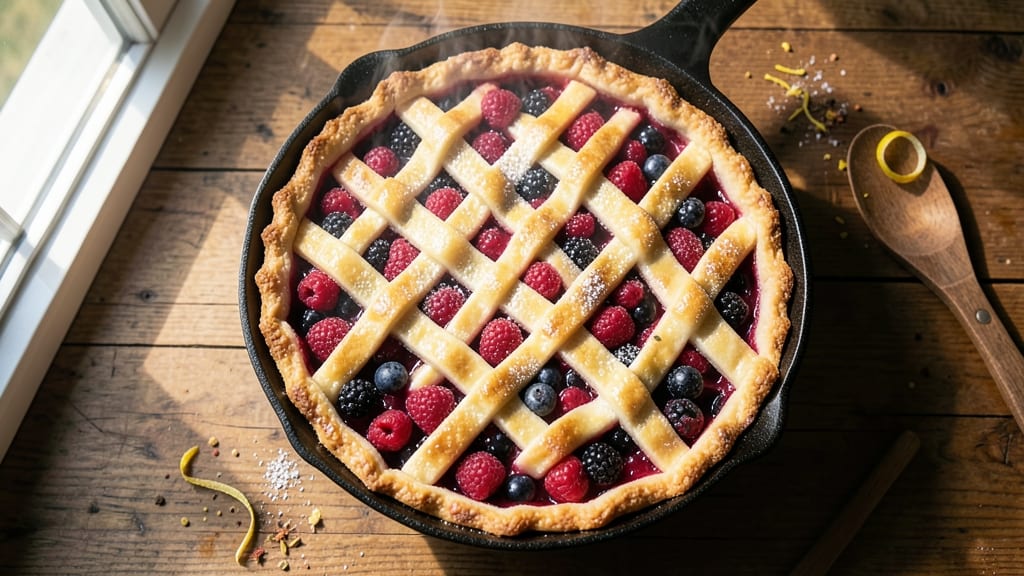
This American berry pie recipe delivers the quintessential summer dessert—juicy, fragrant berries peeking through a golden lattice crust that flakes apart at the slightest touch. The secret lies in balancing tender fruit filling with a perfectly flaky crust, whether you choose homemade or store-bought dough.
I’ve baked countless pies, and this method guarantees a lattice pattern that’s both beautiful and sturdy enough to hold up to the juices.
What sets this recipe apart is the two-step filling process: simmering the berries with sugar and thickener first to release natural juices, then baking them uncovered to create that signature "bursting through" effect.
A lattice crust adds rustic charm while allowing steam to escape, preventing a soggy bottom. The result? A pie that looks like it came from a farmstand bakery but requires no special skills.
By the time it emerges from the oven, you’ll have a pie with a juicy, fragrant filling that’s just tender enough to hold its shape when sliced, all encased in a crisp, buttery crust.
The lattice pattern creates pockets of golden crust over the bubbling berries, making every bite a perfect balance of texture and flavor. This is the kind of dessert that transforms a simple gathering into a memorable summer moment.
Whether you’re using fresh blueberries, blackberries, or a mixed berry medley, this recipe adapts beautifully while keeping the classic American pie experience intact. The instructions are designed to be approachable for beginners, with tips to ensure your crust stays flaky and your filling stays juicy—no matter which berries you choose.
Ingredients for american berry pie
Juicy berries, flaky crust, and a lattice that lets the fruit shine through—just these essentials for summer's best dessert.
| Ingredient | Amount | Notes |
|---|---|---|
| Fresh Mixed Berries 🍒 | 6 cups | Blueberries, blackberries, raspberries (or combination) |
| Granulated Sugar 🍬 | 1 ½ cups | For sweetness and thickening |
| All-Purpose Flour 🌾 | ¼ cup | For thickening filling |
| Lemon Juice 🍋 | 2 tbsp | Freshly squeezed, brightens berries |
| Unsalted Butter 🧈 | 1 cup | Cold, cubed for flaky crust |
| All-Purpose Flour 🌾 | 2 ½ cups | For crust, plus more for dusting |
| Salt 🧂 | ½ tsp | Fine sea salt preferred |
| Ice Water 💧 | ½ cup | For pie dough binding |
| Granulated Sugar 🍬 | 2 tbsp | For sprinkling on crust |
| Large Egg 🥚 | 1 whole | For egg wash |
| Cornstarch 🌾 | 2 tbsp | Extra for filling thickness |
The berries are everything here. Farmers markets have the juiciest, ripest berries—look for deep color and plumpness. A mix of blueberries, blackberries, and raspberries gives the best texture contrast, but use whatever's freshest. If you're short on time, frozen berries work perfectly—thaw and drain them first. The sugar amount can adjust based on your berries' tartness: if they're extra sweet, reduce to 1.25 cups. For the crust, butter matters—use high-fat, unsalted butter like Plugrá or Land O'Lakes for that signature flakiness.
No mixed berries? Stick to one type—blueberries or blackberries work wonderfully solo. The cornstarch is key for that perfect filling texture: if you're out, use an extra tablespoon of flour. For the crust, if you don't have ice water, add a splash of milk instead. Want to make it ahead? Prep the filling and crust separately—they'll keep in the fridge for up to 2 days before assembly. The lattice pattern is what makes this pie special: cut strips from one dough disc and weave them over the filling like a basketweave. It's easier than it looks, and the result is worth it.
Assemble the pie just before baking—cold butter in the crust is crucial for flakiness, so don't let it sit out too long. Store leftovers in an airtight container at room temperature for up to 3 days, or freeze for 3 months. Reheat slices in a 350°F oven for 5 minutes to restore that crisp crust. The filling reheats beautifully, but the crust is best fresh out of the oven. For serving, a scoop of vanilla ice cream is traditional, but whipped cream works too.
Why You'll Love This Recipe
- Minimal Chopping Required: I swear by this trick—tossing whole berries (stems and all) into the pie with a splash of lemon juice. No peeling, no pitting, just dump-and-bake. The berries soften perfectly, and you still get those juicy bursts.
- Sweet-Tart Magic: That lemon juice isn’t just for show—it brightens the sugar, making the filling taste fresh instead of cloying. Honestly, the balance of buttery crust and tangy-sweet berries is what turns this into my go-to dessert.
- Weekend or Weeknight: Slice it warm for brunch with coffee, or pack individual portions for lunchboxes. The crust holds up for days, and it’s just as welcome at a potluck as it is on my kitchen table.
- Budget-Friendly Luxury: Fresh berries might seem pricey, but this recipe uses what’s on sale—mixed berries in season stretch far, and the crust costs pennies. Plus, leftovers reheat beautifully with a scoop of ice cream. (Yes, even on a Tuesday night.)
Step-by-step instructions for American berry pie
Here's how to make a pie so juicy the berries practically burst through the lattice crust.
Prepare the Juicy Filling
In a large bowl, gently combine the 6 cups fresh mixed berries with 1.5 cups granulated sugar and 2 tbsp lemon juice. Let this mixture sit for 15 minutes—this lets the berries release their juices and the sugar begin to dissolve. You'll see the berries soften slightly and the mixture become glossy.
Next, stir in the 2 tbsp cornstarch and 0.25 cup all-purpose flour. This combination thickens the filling just enough to hold its shape while still allowing those juices to shine. I like to mix this gently with a wooden spoon to avoid crushing the berries too much—you want them to stay intact for maximum bursting effect when baked.
Make the Classic Pie Crust
Cut the 1 cup unsalted butter into small cubes and place them in the freezer for 10 minutes to firm up. In a large bowl, whisk together 2.5 cups all-purpose flour and 0.5 tsp salt. Add the cold butter cubes and work them into the flour using your fingertips or a pastry cutter until the mixture resembles coarse crumbs with pea-sized butter pieces.
Drizzle in 0.5 cup ice water, 1 tablespoon at a time, mixing gently with a fork until the dough just comes together. It shouldn't be sticky—if it is, add a little more flour. Shape the dough into two equal disks, wrap in plastic wrap, and chill in the refrigerator for at least 1 hour. This resting time is crucial for developing flavor and making the crust flaky.
Assemble the Pie
Preheat your oven to 375°F. Roll out one of the chilled dough disks on a lightly floured surface to fit a 9-inch pie dish. Transfer it to the dish and trim any excess dough hanging over the edge. Pour the prepared berry filling into the crust, mounding it slightly in the center.
Roll out the second dough disk and cut it into 1-inch wide strips for the lattice crust. Arrange half the strips horizontally across the top of the filling, spacing them about ¼ inch apart. Fold back every other strip, then weave the remaining strips perpendicular to the first layer, alternating as you go. Brush the lattice with beaten 1 whole large egg and sprinkle with 2 tbsp granulated sugar for a golden finish.
Bake to Golden Perfection
Place the pie on a baking sheet (to catch any drips) and bake for 45-50 minutes until the crust is deep golden brown and the filling is bubbling. The lattice should look crisp and the berries should be tender but still hold their shape—if they're too soft, they'll turn to mush.
Let the pie cool for at least 2 hours before slicing. This resting time allows the juices to fully set, preventing them from running everywhere when you serve. The contrast of the warm, juicy filling with the crisp lattice crust is what makes this pie truly special.
Pro Tips For Making American Berry Pie
- Prep Berries Like a Pro: Toss your mixed berries with sugar and lemon juice immediately after washing—don’t let them sit in water. I learned this the hard way when my berries turned mushy; the acidity and sugar draw out moisture fast, so work fast or keep them dry.
- Bake at 375°F, Not Higher: Skip the urge to crank the oven to 400°F for faster browning—berries need time to soften without turning to jam. 375°F gives you a tender filling and a flaky crust without burning the edges (yes, even if you’re impatient like me).
- Vent That Crust: Poke holes in the pie dough before baking—everywhere—or risk a steam explosion that’ll make your crust soggy. I used to skip this, and half the time, the filling would bubble over and ruin the golden color.
- Use Cold Butter in the Crust: Cut that butter into flour until it looks like coarse crumbs, not pea-sized chunks. Cold butter creates flaky layers, and skipping this step means a dense, greasy crust. (Your future self will thank you for the 5 extra minutes of chilling.)
Essential equipment for this recipe
Pie Dish Essentials
Start with a 9-inch glass or ceramic pie dish—it distributes heat evenly and prevents soggy bottoms. I swear by Pyrex for its durability and even baking, but any oven-safe dish works.
Avoid dark metal pans, which can overbrown the crust too quickly. For a rustic look, try a cast-iron skillet (like Lodge)—it adds extra crispiness to the edges. 🔥
Rolling Pin & Dough Tools
A wooden rolling pin is my go-to for pie crusts—it prevents sticking and gives a smoother texture. The Norpro 10-inch is my favorite, but any well-seasoned wooden pin works.
For cutting dough strips, a sharp chef’s knife or pizza cutter makes clean, even lattice strips. Keep a bench scraper handy for trimming excess dough neatly.
Lattice Cutting Guide
Use a ruler or measuring tape to mark 1-inch-wide strips on your dough before cutting. For precision, I like the OXO Good Grips ruler—it’s easy to read and won’t slip. A pastry brush (like King Arthur’s) is essential for brushing the lattice with egg wash.
Don’t skip the egg wash—it gives that golden, glossy finish that makes the pie look bakery-fresh.
Baking Sheet & Tools
Line a half-sheet baking pan under your pie to catch any filling drips—this keeps your oven clean and makes cleanup easier. I recommend Wilton’s non-stick baking sheets for effortless release. A pie crust shield (like Wilton’s) can help prevent over-browning if your oven runs hot.
For checking doneness, a thermometer isn’t necessary, but keep an eye on the crust’s color and the filling’s bubbles.
Cooling & Serving
After baking, transfer the pie to a wire cooling rack to prevent sogginess from trapped steam. A pie server with a serrated edge makes clean slices, but a sharp steel knife works in a pinch.
For serving, a pie stand elevates the dish beautifully—Le Creuset’s ceramic stands are my favorite for both function and style. 💫
Nutrition facts
Frequently asked questions
Can I use frozen berries instead of fresh?
Frozen berries work perfectly—just thaw and drain them thoroughly before using. The texture will be slightly softer, but the flavor remains rich. For best results, use a mix of blueberries and blackberries since they hold their shape better when frozen. Avoid raspberries if using all frozen, as they tend to turn mushy.
How do I prevent a soggy bottom crust?
Prevent sogginess by pre-baking the bottom crust for 10 minutes at 375°F before adding filling. Another trick is to sprinkle a thin layer of dried breadcrumbs or crushed cornflakes between the crust and filling to absorb excess moisture. Always use a 9-inch glass pie dish for even heat distribution.
What's the best way to make lattice strips?
Roll out your second dough disk and cut 1-inch wide strips using a ruler for precision. Arrange half horizontally, then fold back every other strip before weaving perpendicular strips underneath. Press gently where strips cross to seal. Keep the strips about ¼ inch apart for that classic pie look and proper air circulation.
Can I make this pie ahead of time?
Yes! Assemble the pie (unbaked) and refrigerate for up to 24 hours before baking. For best results, bake it 1-2 hours before serving—this lets the filling set properly. Store leftovers in an airtight container at room temperature for 3 days or freeze for 3 months. Reheat slices at 350°F for 5 minutes to restore crust crispness.
What if my lattice collapses during baking?
This usually happens if the filling is too wet or the strips aren't properly sealed. To fix: Chill the assembled pie for 30 minutes before baking, and brush the lattice with extra egg wash to strengthen it. If it collapses slightly, don't worry—the filling will still taste amazing! For next time, ensure your filling has thickened properly before assembling.