
Desserts
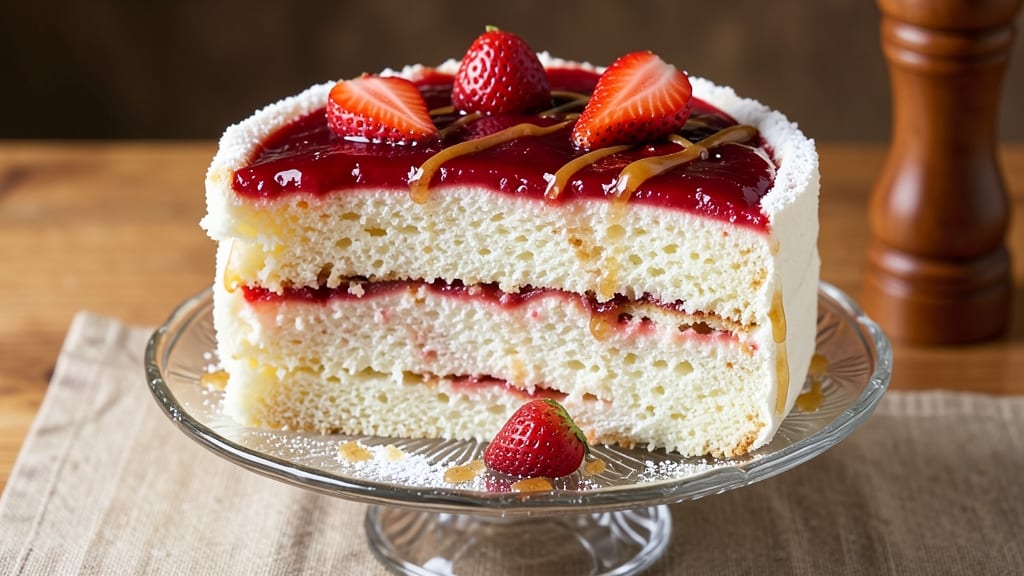
This angel food cake and strawberry pie filling recipe transforms a classic dessert into a showstopping masterpiece—where ethereal cake meets vibrant, juicy strawberries in perfect harmony. 💛 The secret lies in baking the cake to a tender yet sturdy texture, then pairing it with homemade filling that balances sweetness and tartness without overpowering the delicate cake.
What sets this recipe apart is the foolproof technique for both components: a light, airy angel food cake that stays moist for days, and a strawberry pie filling thickened naturally with cornstarch for a perfect consistency.
No shortcuts—just restaurant-quality results that look and taste like they came from a professional bakery.
The final dessert is a stunning presentation—whether layered with whipped cream, dusted with powdered sugar, or served with fresh berries on top. The contrast of fluffy cake and rich, jammy strawberries creates a balance of textures that’s impossible to resist.
Every bite delivers that perfect marriage of lightness and fruity depth.
Ready in just 1 hour and 15 minutes, this dessert is ideal for special occasions, potlucks, or treating yourself after a long week. The best part? Leftovers keep beautifully, so you can enjoy this masterpiece for days. Let’s get baking!
Ingredients for angel food cake and strawberry pie filling
Twelve egg whites, two pounds of strawberries, and a touch of magic—this is where lightness meets bursting berry bliss.
| Ingredient | Amount | Notes |
|---|---|---|
| Large Egg Whites 🥚 | 12 whole | Room temperature, pasteurized if preferred |
| Granulated Sugar 🍚 | 1 ½ cups | Superfine preferred for even texture |
| All-Purpose Flour 🌾 | 1 ½ cups | Sifted, for lightness |
| Cream of Tartar 🧂 | 1 ½ tsp | Stabilizes egg whites |
| Vanilla Extract 🌿 | 1 tbsp | Pure, high-quality extract |
| Salt 🧂 | ½ tsp | Fine sea salt |
| Fresh Strawberries 🍓 | 2 lbs | Hull and slice, organic preferred |
| Granulated Sugar (for filling) 🍚 | 1 ¼ cups | Adjust for tartness |
| Cornstarch 🌾 | 2 tbsp | For perfect thickening |
| Lemon Juice 🍋 | 2 tbsp | Freshly squeezed |
| Unsalted Butter 🧈 | ½ cup | Cold, cubed for topping |
| Powdered Sugar 🍚 | ¼ cup | For dusting |
The egg whites are non-negotiable here—room temperature is key for maximum volume. Grab the pasteurized kind if you're worried about salmonella, but fresh works beautifully too. Trader Joe's sells them pre-pasteurized in cartons, which saves time. For the strawberries, organic is ideal—they're sweeter and less likely to bleed color. Local farmers markets often have the best selection in peak season, but conventional berries work fine. Don't skip hulling them completely—the filling will be smoother. The vanilla extract? Use the good stuff—imitation vanilla has no depth. Measure it carefully though; too much can overpower the delicate cake.
No cream of tartar? Substitute with lemon juice at half the amount, but your cake won't be quite as stable. For the strawberry filling, frozen berries work in a pinch—thaw and drain them first. The cornstarch is crucial—Diamond Crystal brand is my go-to for consistent thickening. If you're making this ahead, prepare the filling first and store it separately; it thickens as it cools. The butter for topping? European-style butter like Plugrá has higher fat content and melts beautifully. For the powdered sugar, sift it before dusting to avoid clumps—trust me, it makes all the difference.
The cake keeps beautifully in an airtight container for up to 5 days at room temperature, though it's best enjoyed within 3 days. The filling can be made 2 days ahead and stored in the fridge—just reheat gently before assembling. For a showstopper presentation, dust with powdered sugar right before serving. Leftovers? The cake freezes well for up to 3 months—wrap it tightly in plastic wrap and foil. The filling doesn't freeze as nicely, so make it fresh when serving. This dessert is worth every minute of prep—your guests will think you're a professional!
Why You'll Love This Recipe
- Here’s the kicker: this recipe uses ingredients you already own. Egg whites? Check. Sugar? Check. A splash of vanilla? Boom. No specialty items, no last-minute grocery runs. And the leftovers? I’ve reheated slices in the microwave for breakfast toast—yes, really—and they’re still crave-worthy.
- No Whisk Fatigue: I swear by this method—whipping egg whites with cream of tartar until stiff peaks form is the secret. No mixer? A hand whisk works fine, and honestly, the result is lighter than any boxed cake I’ve ever tried. That’s the magic of fresh egg whites and sugar folded in just right.
- Strawberry Perfection: The filling is where this combo shuts it down. Thick, jammy strawberries simmered with sugar until they’re just set—no gummy aftertaste, no watery mess. Pair that with the cake’s airy texture, and you’ve got dessert that tastes like summer in every bite.
- Birthday Party Ready: I’ve used this for everything from casual Sunday brunch to a last-minute 90th birthday cake. The cake layers like a dream (no greasing needed, thanks to that flour trick), and the filling keeps its shape when chilled. Slap on some whipped cream, and suddenly you’re the hero of the day.
Step-by-step instructions for angel food cake and strawberry pie filling
Here's the method to create an ethereal angel food cake paired with a vibrant strawberry filling.
👨🍳 Step 1: Prepare the Angel Food Cake Batter
Begin by separating the 12 whole Large Egg Whites from the yolks, ensuring no trace of yolk remains in the whites. Place the whites in a spotlessly clean, grease-free bowl—any fat will prevent proper whipping. In a separate bowl, whisk together the 1.5 cups Granulated Sugar, 1.5 cups All-Purpose Flour, 1.5 tsp Cream of Tartar, 1 tbsp Vanilla Extract, and 0.5 tsp Salt. Sift the dry ingredients together to eliminate any lumps.
Here's the thing—your mixer attachment matters. Use the whisk attachment for this step. With the mixer on low speed, gradually add the sugar mixture to the egg whites while mixing. Increase speed to medium and whip for 5 minutes until soft peaks form. You'll see the mixture thicken noticeably and hold its shape when the whisk is lifted. This is your signal to increase speed to high and whip for another 7-8 minutes until the meringue is glossy and forms stiff peaks that stand straight up when the whisk is lifted. The bowl should feel cool to the touch—this indicates proper aeration.
🍳 Step 2: Bake the Angel Food Cake
Preheat your oven to 350°F using the upper third rack only—this ensures even heat distribution. Generously grease a 10-inch tube pan with nonstick spray, but don't use any flour as it can weigh down the cake. Gently fold one-third of the batter into the prepared pan using a spatula, tapping the pan lightly on the counter to release any air bubbles. This creates a sturdy base.
Spread the remaining batter evenly over the base, creating a dome shape with slightly higher edges. Bake for 35-40 minutes until the top springs back when gently touched and the cake pulls away from the sides of the pan. Here's where patience pays off—don't open the oven door during baking or you risk collapsing that beautiful structure. When done, turn off the heat and let the cake cool completely in the pan for 1 hour before inverting onto a wire rack.
🍓 Step 3: Prepare the Strawberry Pie Filling
While the cake cools, hull and slice the 2 lbs Fresh Strawberries, removing any tough stems. In a large bowl, combine the strawberries with 1.25 cups Granulated Sugar (for filling) and 2 tbsp Lemon Juice. Let this mixture sit for 15 minutes to allow the strawberries to release their juices. This maceration step enhances the strawberries' natural sweetness and prevents a watery filling.
In a small saucepan, whisk together 2 tbsp Cornstarch with 2 tablespoons of the strawberry juice. Slowly pour this slurry into the remaining strawberry mixture while stirring continuously. Transfer everything to the saucepan and cook over medium heat, stirring constantly, until the filling thickens enough to coat the back of a spoon—about 5-7 minutes. The filling should be glossy and coat the spoon like pudding. Immediately transfer to a bowl and press plastic wrap directly onto the surface to prevent a skin from forming. Chill until completely cool.
🥘 Step 4: Assemble and Serve
Once both the cake and filling are completely cool, it's time to assemble. Place the inverted angel food cake on a serving plate, right side up. Spoon the chilled strawberry filling over the top, spreading it evenly to the edges. Dot with 0.5 cup cold Unsalted Butter cubes for a luxurious finish. The butter will melt slightly as it sits, creating a silky texture that complements the tart strawberries.
Finally, dust the entire dessert with 0.25 cup Powdered Sugar using a fine-mesh sieve. This creates a snowy finish that contrasts beautifully with the vibrant strawberry filling. Serve immediately while the cake is still light and airy. Each slice should reveal that perfect balance of ethereal cake and bursting berry filling—truly a match made in dessert heaven.
Pro Tips For Making Angel Food Cake And Strawberry Pie Filling
- Whip Egg Whites Cold: Grab your bowl and place it in the freezer for 5 minutes before starting. Cold surfaces help stabilize the whites faster—no more struggling to get stiff peaks when you’re already out of breath from beating.
- Sift Flour Like Your Cake Depends on It: I learned this the hard way—lumpy flour means dense cake. Sift the all-purpose flour twice (once before mixing, once after) to cut down on clumps. Yes, it’s extra work, but your cake will thank you with a lighter crumb.
- Don’t Rush the Sugar Addition: Add the granulated sugar gradually—no more than 1 tablespoon at a time—and always re-whip to dissolve. Dumping it all in at once? You’ll end up with a sad, grainy mess instead of silky meringue.
- Bake Until the Center Springs Back: Your cake’s done when the top springs back when touched and the edges pull away from the pan. Overbaking dries it out, but underbaking means a gummy center—neither is ideal for that perfect slice.
Essential equipment for perfect results
Tube Pan Essentials
A 10-inch tube pan is non-negotiable for this recipe—it creates the signature dome shape that holds filling perfectly. I recommend Wilton's nonstick tube pan for its even heat distribution and easy release.
Avoid dark-colored pans—they can over-bake the cake's edges. Grease it thoroughly with Pam baking spray (no flour!) to prevent sticking. 💛
Stand Mixer Must-Haves
Your mixer's whisk attachment is the star here. I use a KitchenAid stand mixer with the flat beater attachment for whipping egg whites—it creates the most stable meringue. If using a hand mixer, opt for the Cuisinart HM-90BCS with its powerful motor.
Clean bowls are critical: wash with hot, soapy water and dry completely to avoid fat residue that prevents proper whipping.
Precision Tools
A fine-mesh sieve is essential for dusting powdered sugar evenly—Norpro's 3-inch sieve is my go-to. For the strawberry filling, a medium saucepan with sloped sides prevents spills during thickening.
I also keep a digital kitchen scale handy to measure ingredients by weight for consistency, though the recipe uses volume measurements.
Cooling & Storage
An airtight container is crucial for storage—I use Glasslock 1-quart containers for the cake and Rubbermaid 1-pint containers for the filling. For cooling the cake, a wire cooling rack with a tray underneath catches any drips. The rack should be large enough to accommodate the entire pan for even cooling.
Assembly Extras
For presentation, a fine-mesh sieve (again!) helps dust powdered sugar perfectly. I also keep tweezers handy for placing butter cubes decoratively. A spatula with a flexible head makes spreading filling easier without tearing the cake. For serving, individual dessert plates with a white or gold rim elevate the presentation beautifully.
Optional Upgrades
For a food processor, the Cuisinart DLC-0223PS handles strawberry hulling efficiently. A thermometer ensures your oven is at 350°F—I use the Thermoworks Oven Thermometer for accuracy. For freezing leftovers, quart-sized freezer bags with zip-top closures prevent freezer burn while maintaining freshness. 💡
Nutrition facts
Frequently asked questions
Can I make this dessert without a tube pan?
A tube pan is ideal for the signature shape, but you can use a 9-inch round cake pan instead. Line the bottom with parchment paper for easy release. The cake will be slightly denser, but still delicious! For presentation, slice the cake into wedges and layer with filling on individual plates.
How do I adjust the sweetness of the strawberry filling?
Taste the strawberries before adding sugar—they vary in natural sweetness. For tart berries, increase sugar to 1.5 cups; for very sweet ones, reduce to 1 cup. The lemon juice also balances flavors, so adjust it too (1-3 tbsp). Always taste after cooking and adjust while warm.
Why did my angel food cake collapse?
Collapse happens when the oven door opens too early or the cake isn't fully cooled before removing. Always preheat for 15 minutes and avoid opening the oven during baking. Let the cake cool 1 hour in the pan before inverting. For extra stability, chill the pan on a wire rack for 10 minutes before inverting.
Can I make this dessert ahead of time?
Yes! Bake the cake 1 day ahead and store in an airtight container. Make the filling 2 days ahead and refrigerate. Assemble just before serving. The cake stays light, and the filling thickens beautifully when reheated gently. Perfect for special occasions!
What's the best way to serve this dessert?
Slice the cake into wedges and serve on individual plates with filling spooned on top. For elegance, dust with powdered sugar and add fresh berries. Pair with whipped cream or a scoop of vanilla ice cream. Garnish with mint leaves for a restaurant-worthy touch!