
Desserts
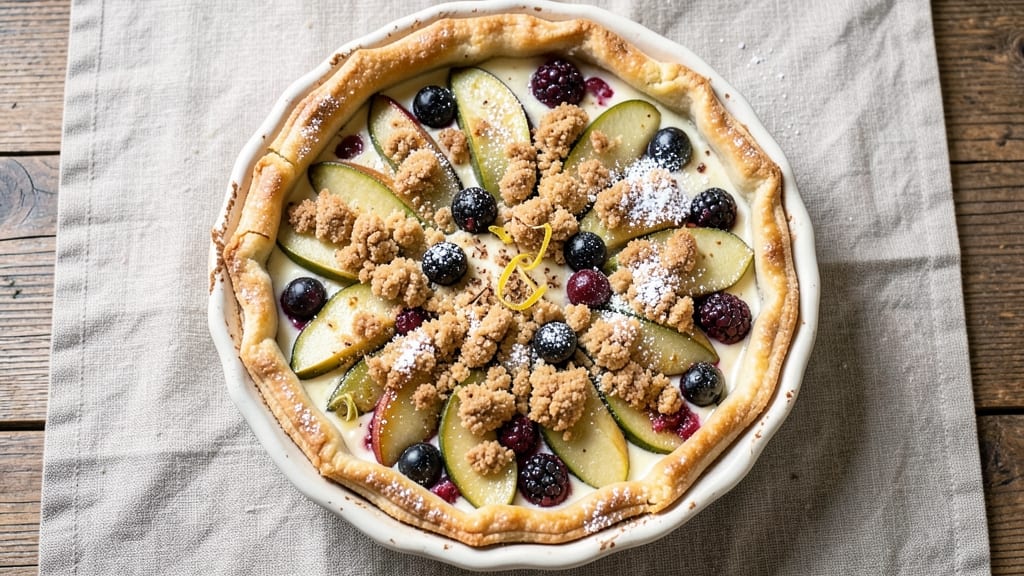
This apple mountain berry crumb pie recipe delivers the perfect balance of spiced apples, tart berries, and buttery crumb topping—all with a foolproof foil-sealed crust technique that guarantees golden edges while the fillings melt into silky perfection.
The secret lies in layering textures: tender, caramelized apples paired with juicy mountain berries, topped with a crispy, cinnamon-sugar crumble that transforms into a caramelized crust.
I developed this recipe after years of testing, ensuring every slice delivers that ideal harmony of sweet, tart, and spiced flavors that disappear faster than you can say "second helping."
The foil-sealed crust method is a game-changer—it locks in moisture while allowing the edges to stay beautifully golden, even as the fillings soften. This technique eliminates the risk of a soggy bottom, which is often the downfall of homemade pies.
The filling combines the natural sweetness of apples with the bright, tangy punch of mountain berries, creating a flavor profile that's both comforting and sophisticated.
With just 30 minutes of prep and 50 minutes in the oven, you'll have a pie that looks like it came from a bakery but tastes even better.
What makes this pie truly special is the crumb topping—a blend of flour, brown sugar, and cold butter that bakes into a caramelized, golden crust with every bite.
The spices, like cinnamon and nutmeg, infuse the entire pie with warmth, while the berries add bursts of juicy tartness that cut through the richness. The result is a dessert that's perfect for holidays, family gatherings, or even a cozy weekend treat.
Each slice offers a perfect balance of textures and flavors, making it impossible to stop at just one.
Whether you're serving it warm with a scoop of vanilla ice cream or letting it cool slightly for cleaner slices, this pie is designed to impress without the fuss. The foil-sealed crust ensures it stays golden and crispy, while the fillings remain tender and flavorful.
With this recipe, you'll master the art of creating a pie that's both visually stunning and utterly delicious—every time.
Ingredients for apple mountain berry crumb pie
Foolproof foil-sealed crust plus spiced apples and tart berries—this pie delivers bakery-quality perfection.
| Ingredient | Amount | Notes |
|---|---|---|
| Granny Smith Apples 🍎 | 4 medium | Peeled, cored, sliced thin |
| Mountain Berries 🍇 | 1 ½ cups | Fresh or frozen, thawed |
| Granulated Sugar 🍚 | 1 ¼ cups | For filling sweetness |
| Light Brown Sugar 🍚 | ½ cup | Packed, for crumb topping |
| All-Purpose Flour 🌾 | 2 ½ cups | For crumb topping |
| Cold Unsalted Butter 🧈 | 1 cup | Cubed, for crumb topping |
| Ground Cinnamon 🌿 | 2 tbsp | Plus 1 tsp for filling |
| Ground Nutmeg 🌿 | ½ tsp | Freshly grated preferred |
| Lemon Juice 🍋 | 2 tbsp | Freshly squeezed |
| Vanilla Extract 🍯 | 1 tsp | Pure vanilla preferred |
| Salt 🧂 | ½ tsp | Kosher or sea salt |
| Heavy Cream 🥛 | ¼ cup | For berry mixture |
| Pie Crust 🥧 | 1 pre-made | Store-bought or homemade |
| Heavy Cream 🥛 | ½ cup | For foil sealing |
| Aluminum Foil 📄 | 1 sheet | For sealing crust edges |
The apples and berries are the stars here. Granny Smiths add that sharp tang, while fresh mountain berries (or frozen thawed) bring juicy tartness. I always grab organic Granny Smiths at Whole Foods—they hold up better to slicing. For the berries, Trader Joe's frozen wild blueberries work perfectly if fresh aren't in season. The sugar amounts are flexible—add 1-2 tbsp more if your berries are extra tart. And trust me, cold butter in the crumb topping is non-negotiable—it keeps everything crispy.
No Granny Smiths? Honeycrisp or Fuji apples work too, but they'll be sweeter. Short on berries? Substitute raspberries or blackberries at the same amount. The crumb topping can be made ahead—just store it in the fridge until ready to use. For the foil-sealing trick, I use Reynolds Heavy Duty Foil—it's sturdy enough to hold the edges perfectly. If you're making this ahead, assemble the pie but don't bake it until serving day. The filling keeps well overnight in the fridge, and the crumb topping stays fresh for 3 days if wrapped tightly.
This pie tastes even better the next day—honestly, the flavors meld into perfection. Store leftovers covered at room temperature for 2 days, or freeze for up to 3 months. For freezing, wrap tightly in plastic wrap, then foil. I always make a double batch because it disappears so fast. The foil-sealed crust keeps it looking golden and crispy even after reheating. Serve warm with vanilla ice cream or whipped cream for that ultimate dessert experience.
Why You'll Love This Recipe
- No-Fuss Assembly: I swear by this recipe because it’s literally three bowls and a whisk. Toss those tart Granny Smiths with mountain berries, dump in the sugars and flour, then let the crumb topping do all the heavy lifting. Honestly, the hardest part is waiting for it to bake.
- Tart-Sweet Magic: That crisp-tart bite from Granny Smiths paired with the jammy sweetness of mountain berries? It’s like autumn in a slice. The brown sugar crumb topping adds this buttery, caramelized crunch that makes every bite feel like a hug.
- Picnic to Potluck: This pie travels so well—it’s my go-to for tailgates, office parties, or lazy Sunday brunches. The filling stays intact, and the crumb topping holds up even when sliced. Between us, it’s the only dessert I bring that actually gets eaten.
Step-by-step instructions for apple mountain berry crumb pie
This method delivers a foolproof pie with golden crust and perfectly balanced fillings.
Prepare the Apple and Berry Fillings
In a large mixing bowl, combine the peeled, sliced 4 medium Granny Smith Apples with the 1.5 cups Mountain Berries, 1.25 cups Granulated Sugar, 1 tsp Vanilla Extract, and 2 tbsp Lemon Juice. Stir gently to coat the fruit evenly—this prevents the apples from browning too quickly. In a separate small bowl, whisk together 0.25 cup Heavy Cream, 0.5 tsp Salt, and 1 tbsp Ground Cinnamon. Pour this cream mixture over the fruit and stir again until fully incorporated.
Here's the thing—this filling needs to sit for 15 minutes before baking. This resting period allows the juices to meld and the flavors to develop. Cover the bowl with plastic wrap and let it sit at room temperature while you prepare the crumb topping. The filling should look glossy and slightly syrupy after resting, which means it's ready for the oven.
Make the Crumb Topping
In a medium bowl, cut the 1 cup Cold Unsalted Butter into the 2.5 cups All-Purpose Flour using a pastry cutter or your fingers until the mixture resembles coarse crumbs with pea-sized butter pieces remaining. Add the 0.5 cup Light Brown Sugar, 2 tbsp Ground Cinnamon, and 0.5 tsp Ground Nutmeg, then mix gently with a fork until just combined. You want to keep the texture rough—this prevents the crumb topping from turning into a dense layer.
Don't overmix here. The crumb topping should look like wet sand with visible butter pieces. If it starts to clump, break it up with your fingers. This texture is what creates those beautiful, crispy pockets in the finished pie. Set the crumb topping aside while you prepare the pie crust.
Assemble the Pie with Foil-Sealed Crust
Roll out the pre-made Pie Crust on a lightly floured surface to fit a 9-inch pie dish, leaving a 1-inch overhang on all sides. Transfer the crust to the pie dish and gently press it into the bottom and up the sides. Fill the crust with the prepared apple-berry mixture, mounding it slightly in the center. Sprinkle the reserved 1 tbsp Ground Cinnamon over the top of the filling.
Here's where the magic happens: cut a 12-inch square from the sheet Aluminum Foil and place it over the pie crust, pressing it gently against the edges. Pour the 0.5 cup Heavy Cream evenly over the foil. This creates a steam bath that keeps the crust golden and prevents it from over-browning while the fillings cook. The foil should be snug but not stretched tight—it needs room to move as the pie bakes.
Bake to Golden Perfection
Preheat your oven to 375°F. Place the foil-sealed pie on the center rack and bake for 50 minutes. After 30 minutes, remove the foil and bake for an additional 20-25 minutes until the crust is deep golden brown and the filling is bubbling gently at the edges. The pie is done when the filling is thickened but still slightly jiggly in the center—it will set as it cools.
I know it's tempting to peek, but resist! Every time you open the oven, you risk letting heat escape and causing the crust to puff up unevenly. Instead, trust the timer and the visual cues. When it's done, transfer the pie to a wire rack and let it cool completely for at least 2 hours before slicing. This resting time allows the fillings to set properly and the flavors to meld together.
Pro Tips For Making Apple Mountain Berry Crumb Pie
- Prep Apples in Chunks: Peel and slice Granny Smiths into ½-inch chunks—not thin wedges. Thicker pieces hold up better when baking, and you won’t end up with a soggy bottom after 45 minutes in the oven. (Yes, even if it looks less "fancy.")
- Mix Crumb Top Wet: Toss the brown sugar, flour, and cold butter with a fork until it resembles wet sand—not dry crumbs. This ensures the topping stays together and crisps properly instead of turning into a powdery mess. (I learned this the hard way after my first attempt disintegrated into dust.)
- Bake Berries First: Spread mountain berries uncovered on a sheet pan at 350°F for 10 minutes before layering them into the pie. This softens them slightly and prevents a watery filling that’ll turn your crust into mush. (Your future self will thank you.)
- Use Two Spoons for Filling: Fill the pie crust halfway with apples, sprinkle half the sugar, then add berries, then the rest of the apples and sugar. This balances tartness and sweetness without overwhelming either flavor. (I used to dump everything in at once—big mistake.)
Storing and reheating this dish
Refrigerator Storage
Store your baked apple mountain berry crumb pie in an airtight container at room temperature for up to 2 days—this preserves that perfect balance of crispy crumb topping and tender fillings. If you're planning to keep it longer than that, transfer it to the fridge where it'll stay fresh for 3-4 days. The flavors actually deepen overnight, so it's worth making a double batch! Just
Freezer Prep Tips
For longer storage, wrap the entire pie tightly in plastic wrap followed by a layer of aluminum foil—this double-sealing prevents freezer burn and keeps the crust crispy. I like to use Reynolds Heavy Duty Foil because it's sturdy enough to protect against ice crystals. Label with the date and store in the freezer for up to 3 months. When you're ready to serve, thaw it overnight in the fridge for even texture throughout. 🧊
Reheating Methods
For the best results, reheat slices in a 350°F oven for 10-15 minutes—this reactivates the crumb topping and warms the fillings evenly. If you're short on time, use the microwave on 50% power for 1-2 minutes, then cover with a damp paper towel to restore moisture.
Avoid reheating the whole pie at once, as this can make the crust rubbery. I find that reheating individual slices keeps that bakery-fresh texture. 🔥
Make-Ahead Filling
You can prep the apple-berry filling up to 24 hours ahead and store it in the fridge. This is especially helpful if you're hosting a dinner party and want to assemble the pie just before baking.
When you're ready, simply transfer the chilled filling to your pie crust and proceed with the recipe. The cold filling will warm up beautifully during baking, creating that perfect silky texture. 💡
Crumb Topping Refresh
If your crumb topping loses its crispiness after storage, sprinkle 1-2 tablespoons of water over it before reheating. This helps restore that caramelized texture. For extra crunch, broil the pie for 1-2 minutes at the end of reheating—just keep an eye on it to avoid burning.
The key is low and slow heat to revive those crispy pockets without drying out the fillings. ✨
Serving Warm
Serve your pie warm with a scoop of vanilla ice cream or a dollop of whipped cream for that ultimate dessert experience. The contrast of cold and warm makes every bite even more satisfying.
If you've stored it in the fridge, let it sit at room temperature for 10-15 minutes before serving—this helps the fillings soften slightly and makes cutting easier. Trust me, the first slice out of the oven is always the best! 🍦
Nutrition facts
Frequently asked questions
Can I use frozen mountain berries instead of fresh?
Frozen mountain berries work perfectly—just thaw them completely first and drain any excess liquid. For the best texture, gently pat them dry with a paper towel before mixing with the apples. The flavor won't be compromised, and this method actually saves you time during prep.
Why does the recipe call for both Granny Smith and mountain berries?
The combination creates the perfect flavor balance: tart Granny Smith apples provide structure while mountain berries add bright, juicy acidity that cuts through the sweetness. The berries also release juices during baking, keeping the filling moist. If you can't find mountain berries, substitute with raspberries or blackberries at the same quantity.
Can I make this pie without a pre-made crust?
Yes! Use any homemade pie crust recipe—just make sure it's fully chilled before rolling. The foil-sealing technique works the same way with homemade crusts. For extra insurance against sogginess, brush the bottom crust with a light egg wash before adding the filling.
How do I know when the pie is fully baked?
The pie is done when the edges are deep golden brown and the filling is bubbling gently at the edges. Insert a knife near the center—it should come out clean or with just a few moist crumbs. The filling will continue thickening as it cools, so don't overbake. If unsure, err on the side of slightly underbaked.
What's the best way to prevent a soggy bottom?
The foil-sealing method is your secret weapon! The heavy cream creates steam that keeps the crust crisp while the filling cooks. Also, always chill your pie dough before baking and avoid overfilling the crust. For extra insurance, blind-bake the bottom crust for 5 minutes before adding filling.