
Desserts
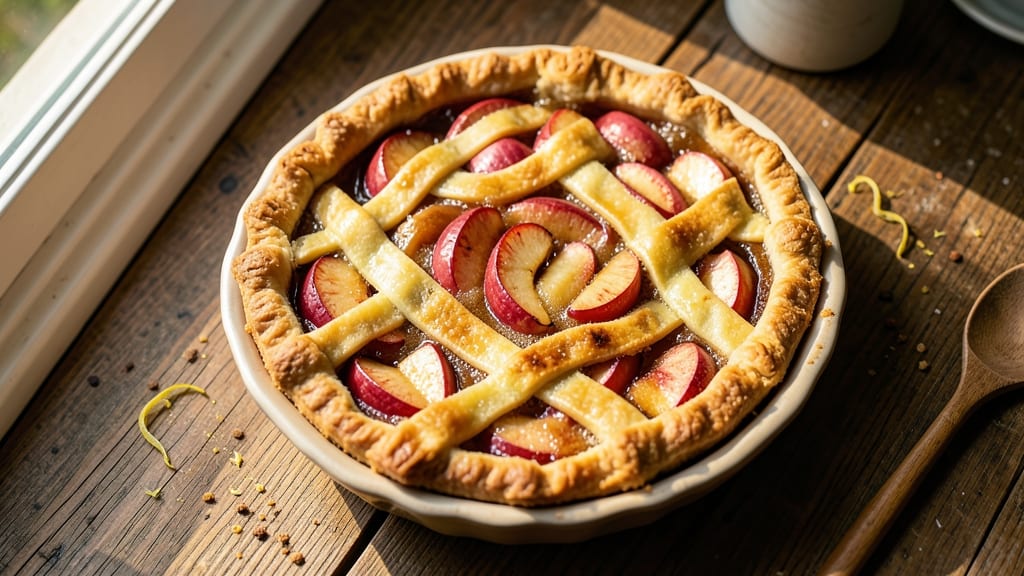
This plain apple pie recipe delivers the quintessential comfort of a classic dessert with minimal fuss. The secret lies in a buttery, flaky crust that holds its shape while encasing a spiced apple filling that caramelizes beautifully during baking.
I've perfected this version over years of baking, ensuring every slice delivers that perfect balance of tender crust and fragrant, slightly crisp apples.
The beauty of this recipe is its simplicity—no fancy lattice crusts or elaborate fillings required. A basic double-crust pie (or single if you prefer) provides structure, while a mix of tart and sweet apples (like Granny Smith and Honeycrisp) creates the ideal flavor profile.
The cinnamon, nutmeg, and brown sugar blend transforms ordinary apples into something extraordinary, with just enough lemon juice to keep the filling from turning mushy.
Baking at 350°F for 50 minutes ensures a golden-brown crust and tender yet slightly firm filling, with edges that caramelize into sticky sweetness. The aroma alone—warm spices mingling with baking apples—will have your kitchen smelling like autumn in minutes.
Serve it warm with vanilla ice cream or whipped cream for the ultimate classic dessert experience.
Whether you're baking for a family gathering or simply craving a taste of nostalgia, this pie delivers restaurant-quality results with minimal effort. The crust stays crisp, the filling holds its shape, and every bite tastes like a homemade hug.
Let's get started on creating your perfect slice of apple pie tradition.
Ingredients for plain apple pie
Classic crust meets spiced apple perfection—just 14 simple ingredients for restaurant-quality pie.
| Ingredient | Amount | Notes |
|---|---|---|
| All-Purpose Flour 🌾 | 3 cups | Sifted for flaky crust |
| Unsalted Butter 🧈 | 1 ½ cups | Cold, cubed for flakiness |
| Granulated Sugar 🍚 | ½ cup | For crust sweetness |
| Ice Water 💧 | ½ cup | Chilled for pie crust |
| Salt 🧂 | ½ tsp | Kosher preferred |
| Granny Smith Apples 🍎 | 4 medium | Peeled, sliced thin |
| Honeycrisp Apples 🍎 | 2 medium | Peeled, sliced thin |
| Light Brown Sugar 🍚 | ¾ cup | Packed firmly |
| Ground Cinnamon 🍃 | 2 tbsp | Freshly ground preferred |
| Ground Nutmeg 🌿 | ½ tsp | Freshly grated |
| Lemon Juice 🍋 | 2 tbsp | Freshly squeezed |
| Vanilla Extract 🌸 | 1 tsp | Pure vanilla preferred |
| All-Purpose Flour 🌾 | 1 tbsp | For dusting crust |
| Egg 🥚 | 1 whole | For egg wash |
The apples are non-negotiable. Granny Smith brings that bright tartness while Honeycrisp adds natural sweetness and texture. I always grab apples from the local farmers market in late summer—they're sweeter and hold up better during baking. If you can't find Honeycrisp, Fuji or Gala work too. The key is slicing them uniformly thin—about 1/4-inch thick. Use a mandoline if you're fancy, or just go slow with a sharp knife. Parchment paper under the slices prevents sticking and makes cleanup a breeze.
No vanilla extract? Vanilla bean paste works too, or even a pinch of vanilla sugar. Short on brown sugar? White sugar plus a dash of molasses gets you close. The crust needs cold butter—take it straight from the fridge and cut it into chunks. If your butter's too soft, chill it for 20 minutes. The egg wash? Beat the egg with a splash of water for extra shine. And if you're nervous about the crust shrinking, blind bake it for 10 minutes before adding filling—game changer.
This pie tastes even better the next day, so bake it ahead if you can. Keeps 4-5 days in the fridge, wrapped tightly. Freezes beautifully for up to 3 months—just thaw overnight before serving. I always make a double batch. One pie for now, one for later. Slice it warm with vanilla ice cream, and trust me, you'll be making this every autumn.
Why You'll Love This Recipe
- No-Fuss Dough: I swear by this crust—just butter, flour, and ice water. No rolling pins, no stress, and it still holds up like a pro. Even my kid can "help" mix it (with supervision, obviously).
- Sugar-Spiced Magic: That crunchy, caramelized top? Pure reward. The sugar doesn’t just sweeten—it turns the apples into something ridiculously good, like a warm hug in pie form.
- Weeknight Hero: Slice it thin, pack it in containers, and boom—breakfast or dessert for days. Honestly, I’ve fed a crowd with leftovers, and no one’s complained.
- Pantry Staple Power: Five ingredients, zero weird stuff. You’re already stocked. Budget-friendly? Absolutely. Time-saving? Even more so. This pie is my go-to when I need something solid without the fuss.
Step-by-step instructions for classic apple pie
Here's how to make a timeless apple pie with a perfect flaky crust and spiced filling.
Prepare the Flaky Pie Crust
In a large bowl, combine the 3 cups all-purpose flour and 0.5 tsp salt. Cut in the 1.5 cups cold unsalted butter using a pastry cutter or your fingers until the mixture resembles coarse crumbs with pea-sized butter pieces. This cold butter creates those beautiful flaky layers when baked.
Gradually add the 0.5 cup ice water, one tablespoon at a time, mixing gently with a fork until the dough just comes together. Be careful not to overmix—just until the dough holds when pressed. Divide the dough into two equal portions, flatten into discs, wrap in plastic, and chill for at least 30 minutes (or up to 2 days). This resting period relaxes the gluten for that perfect flaky texture.
Assemble the Spiced Apple Filling
Peel, core, and slice the 4 medium Granny Smith apples and 2 medium Honeycrisp apples into ¼-inch thick slices. Toss them immediately with 2 tbsp lemon juice to prevent browning—the acidity will also enhance the apple flavor. In a large bowl, combine the apple slices with 0.75 cup light brown sugar, 2 tbsp ground cinnamon, 0.5 tsp ground nutmeg, and 1 tsp vanilla extract. Gently mix until the apples are evenly coated with the spice mixture.
Here's the thing—don't skip the lemon juice. It keeps your apples from turning mushy during baking and adds a subtle brightness that balances the sweetness. The cinnamon and nutmeg will develop beautifully during baking, creating that warm, comforting apple pie aroma we all love.
Roll Out and Assemble the Crust
On a lightly floured surface, roll out one pie crust disc to fit a 9-inch pie dish, leaving a ½-inch overhang on all sides. Transfer the crust to the pie dish and trim the edges to ¼-inch for a clean finish. Sprinkle the bottom crust with 1 tbsp all-purpose flour—this prevents the filling from sticking to the crust during baking.
Pour the apple filling into the prepared crust, mounding it slightly in the center. The filling should come up about ¾ of the way to the top edge. This gives you room to add the top crust without overflow. Brush the edges of the bottom crust with 1 whole egg beaten with a little water for a golden finish.
Add the Top Crust and Create the Classic Design
Roll out the second pie crust disc to the same size as the bottom crust. Place it over the filling and trim the edges to match. For that classic lattice look, cut the top crust into 8 strips about ½-inch wide. Arrange 4 strips horizontally across the top, then fold back every other strip and lay the remaining 4 strips perpendicular to create a lattice pattern. Press the edges together and crimp the crust all around using a fork or your fingers.
Brush the top crust with the remaining egg wash for a beautiful golden finish. Cut 4 small slits in the center to allow steam to escape during baking. This prevents a soggy bottom and helps the crust brown evenly. The lattice design not only looks stunning but also allows the filling to breathe while keeping it contained.
Bake to Golden Perfection
Preheat your oven to 375°F. Place the pie on a baking sheet to catch any drips and bake for 45-50 minutes, until the crust is deep golden brown and the filling is bubbling through the lattice. The edges should be crisp, and the filling should be tender but not mushy.
If the crust starts browning too quickly, tent it loosely with aluminum foil. The filling is done when it's soft and the apples are tender enough to pierce easily with a knife. Let the pie cool for at least 2 hours before slicing—this allows the filling to set and makes serving easier. The wait is worth it for that perfect texture and flavor combination!
Pro Tips For Making Plain Apple Pie
- CHILL THE DOUGH: After mixing flour, butter, and ice water, wrap the dough in plastic and refrigerate for at least 1 hour—yes, even if you’re eager to roll it out. I used to skip this and ended up with a tough, flaky mess because the butter melted too fast in the oven. Cold dough = crispier crust, no excuses.
- CUT BUTTER IN SMALL: Use a pastry cutter or two forks to break the cold butter into pea-sized pieces before mixing it into the flour. Larger chunks won’t distribute evenly, and you’ll end up with pockets of grease instead of that perfect flaky texture. Trust me, your crust will thank you.
- SALT THE FILLING: Toss your sliced apples with 1/4 teaspoon of salt before adding sugar and cinnamon. It might sound odd, but salt enhances the sweetness and balances the acidity of the apples—especially if you’re using tart varieties. I learned this after a pie tasted bland, and now it’s non-negotiable.
- EGG WASH FOR SHINE: Brush the top crust with a beaten egg mixed with 1 tablespoon of water before baking. It’s not just for looks—this simple step guarantees a golden-brown finish and prevents the edges from burning before the center cooks. (Yes, even if you’re not aiming for a showstopper crust.)
Flavor customization for this plain apple pie
Sweet-Spice Balance
Adjust the sugar levels to match your apple's natural sweetness. If using extra-tart apples like Granny Smith, add 1-2 tbsp more brown sugar to the filling. For sweeter varieties like Gala, reduce sugar by 1 tbsp and boost cinnamon to 2.5 tbsp for warmth.
I often test by tasting raw apples—if they're very tart, I lean on sweetness; if they're mellow, I amplify the spices. 🍎
Warm Spice Variations
Swap out nutmeg for ½ tsp ground cardamom or ¼ tsp cloves for Middle Eastern-inspired warmth. For a modern twist, add ½ tsp smoked paprika to the filling and sprinkle 1 tsp cinnamon-sugar on top before baking.
My go-to is 1 tsp apple pie spice blend (cinnamon + nutmeg + allspice), which cuts prep time but delivers pro-level flavor.
Caramelized Toppings
For extra depth, sprinkle ½ cup chopped walnuts or pecans on the filling before adding the top crust. Or try a honey drizzle**: brush the baked pie with 2 tbsp honey mixed with 1 tsp lemon juice while still warm.
The caramelized honey adds a sophisticated finish that pairs perfectly with vanilla ice cream. 🍯
Tart Twist Options
Add 1 tbsp fresh lime juice to the filling for a citrusy kick, or fold in 2 tbsp blackberry jam for a fruity contrast. For a savory note, sprinkle ½ tsp sea salt over the filling before baking—it enhances all the flavors.
I've even experimented with 1 tsp orange zest in the spice mix for a bright, unexpected twist.
Gluten-Free Adaptation
Replace the all-purpose flour in the crust with 2 cups gluten-free 1:1 baking flour (like Bob's Red Mill) plus ¼ cup cornstarch. Chill the dough 45 minutes extra since gluten-free flours behave differently.
For the filling, use ½ cup gluten-free oat flour to thicken instead of regular flour when dusting the crust. The texture stays crisp with these adjustments!
Make-Ahead Spice Boost
Pre-mix the spices with the sugar in a small airtight container up to 1 month ahead. Store in your pantry for convenience—just add to apples when ready to bake.
I like to make a double batch of this spice mix because it works for apple crumbles, cobblers, and even oatmeal too. Label it clearly so you don't confuse it with other spice blends! ✨
Nutrition facts
Frequently asked questions
Can I use a single crust instead of double?
A single crust works beautifully and saves time. Just press the dough into the pie dish, fill it with apples, then cover the filling with a thin layer of dough strips (cut into 1-inch squares) to create a crimped edge. This keeps the filling contained while letting steam escape. Bake as directed—just watch the edges closely for browning.
What if my crust gets soggy?
Soggy crusts happen when steam gets trapped. Prevent this by pricking the bottom crust with a fork before adding filling, and always cut 4-5 steam vents in the top crust. For extra insurance, sprinkle 1 tbsp cornstarch over the filling before baking. If it's already soggy, broil for 2-3 minutes to crisp the edges after baking.
How do I store leftover apple pie?
Store cooled pie in an airtight container at room temperature for up to 2 days. For longer storage, refrigerate for 4-5 days or freeze for 3 months. To reheat, wrap a slice in foil and warm in a 350°F oven for 10 minutes—this revives the crust's crispness. Freeze individual slices between parchment paper for easy serving.
Can I make this pie ahead of time?
Yes! Assemble the pie (unbaked) and refrigerate for up to 24 hours before baking. For even better results, bake it 1 day ahead—the flavors deepen overnight. Store at room temperature in an airtight container. Reheat slices at 350°F for 10 minutes to restore freshness. The crust stays crisp, and the filling becomes even more flavorful!
What's the best way to slice a warm pie?
Let the pie cool completely (2+ hours) before slicing for clean pieces. Use a hot knife (dipped in hot water) to prevent sticking. For warm pies, slice carefully with a serrated knife—warm filling is more delicate. Serve with vanilla ice cream or whipped cream for the perfect balance of temperatures.