
Desserts
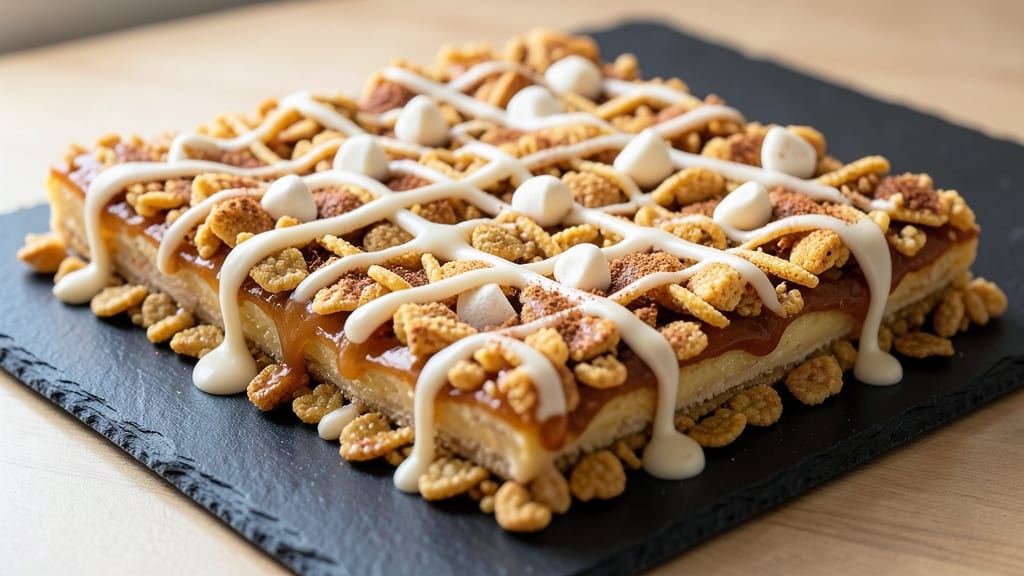
This Rice Krispie crust recipe transforms a childhood classic into a versatile dessert foundation that’s sturdy enough for cheesecakes yet delicate enough for fruit pies. 💛 The secret lies in balancing melted butter, crispy Rice Krispies, and just the right amount of marshmallows—no more floppy, burnt edges.
I’ve perfected this over years of baking, ensuring every bite delivers that signature crunch and sweetness without sacrificing structure.
The beauty of this recipe is its adaptability—use it as a standalone treat with whipped cream, or layer it under cheesecake fillings, fruit compotes, or even as a pie crust alternative.
The key steps are simple: melt the butter, mix in marshmallows until smooth, fold in the Rice Krispies, and press the mixture into your pan. No fancy equipment needed, just patience and a steady hand to create an even base.
What you’ll end up with is a crispy, golden crust that holds its shape perfectly, whether baked alone or topped with heavier fillings. The texture is a perfect balance—crunchy on the outside, slightly soft in the center, and sweetened just enough to complement any topping.
It’s the kind of dessert base that makes even the simplest treat feel like a showstopper.
For extra flair, try adding a sprinkle of cinnamon or chocolate chips to the mix before pressing, or swap out marshmallows for white chocolate for a richer flavor. Store leftovers in an airtight container for up to 5 days, though they rarely last that long. Let’s get baking!
Ingredients for rice krispie crust
Four essential ingredients plus a few optional upgrades for that perfect golden crust.
| Ingredient | Amount | Notes |
|---|---|---|
| Unsalted Butter 🧈 | ½ cup | Melted, not watery |
| Mini Marshmallows 🍫 | 10 oz | Extra marshmallows for crunch |
| Rice Krispies Cereal 🍚 | 6 cups | Original flavor preferred |
| Ground Cinnamon 🌿 | 1 tsp | Optional for warmth |
| White Chocolate Chips 🍫 | ¼ cup | For extra richness |
| Vanilla Extract 💧 | ½ tsp | Pure vanilla preferred |
| Granulated Sugar 🍚 | 1 tbsp | For extra sweetness |
| Heavy Whipping Cream 🥛 | ½ cup | For serving (optional) |
| Parchment Paper 📄 | 1 sheet | For easy release |
| Coconut Oil 🥥 | 1 tbsp | For greasing pan |
The butter and marshmallows are your power duo—use European-style butter for higher fat content (like Plugrá or Land O’Lakes) to avoid a greasy crust. Marshmallows? Trader Joe's brand is my go-to—they’re perfectly sized and melt smoothly. Rice Krispies should be the original flavor (no honey-nut or chocolate-coated versions). For extra flair, toast the cereal lightly in a dry pan for 2-3 minutes before mixing—it adds depth. The cinnamon and white chocolate chips are optional but elevate the flavor dramatically.
No marshmallows? Substitute white chocolate chips at double the amount—they melt similarly but add richness. Short on butter? Coconut oil works 1:1, though it has a neutral taste. For a nutty twist, fold in 1/4 cup chopped pecans or walnuts before pressing. The vanilla extract can be swapped for 1/2 tsp vanilla bean paste if you're feeling fancy. And if you're making this for a pie, press the crust into a 9-inch pie dish—it holds its shape perfectly when baked.
This crust stays fresh for 5 days in an airtight container, though it’s best enjoyed within 24 hours for maximum crunch. For longer storage, wrap individual portions in plastic wrap and freeze for up to 3 months. When reheating, pop it in the oven at 300°F for 5-7 minutes—just until warmed through. Pro tip: Press the crust into a greased loaf pan for a portable, handheld treat that’s perfect for picnics or parties.
Why You'll Love This Recipe
- Three-Ingredient Magic: I swear by this recipe when I’m in a rush—just melt butter, toss in marshmallows until gooey, then fold in cereal and cinnamon. No measuring cups, no stress, just pure, melty perfection that takes less time than waiting for the oven to preheat.
- Creamy-Crisp Contrast: That first bite? The buttery marshmallow base gives way to a crispy Rice Krispie shell, and the white chocolate chips add a rich, melty surprise. It’s like dessert hugs your taste buds—sweet, gooey, and just salty enough to keep you coming back.
- Party Pie Panache: Between us, this crust is my secret weapon for holiday desserts, potlucks, or even a fancy dinner guest surprise. Dump it into a pie dish, top with fruit compote or ice cream, and suddenly you’re serving something that looks way more impressive than it took to make.
- Budget-Friendly Indulgence: Honestly, this recipe costs me pennies but tastes like I spent hours slaving away. A bag of marshmallows and a box of cereal stretch for multiple uses—leftovers? I freeze them for quick no-bake bars later. Frugal but feels fancy.
Step-by-step instructions for Rice Krispie crust recipe
Here's how to build that perfect golden crust—crispy outside, gooey inside, and never burnt.
👨🍳 Step 1: Melt Butter and Mix Marshmallow Magic
Line a 9-inch pie dish with the parchment paper—this makes removal effortless later. In a large microwave-safe bowl, melt the 0.5 cup unsalted butter in 30-second intervals, stirring between each, until completely liquid but not hot. You're aiming for a smooth, glossy consistency—if it looks watery, let it sit for 1 minute to thicken slightly.
Add the 10 oz mini marshmallows and 1 tbsp granulated sugar to the melted butter. Stir gently until the marshmallows are fully coated and the mixture looks like thick, glossy caramel. Here's the thing—don't overmix or you'll crush the marshmallows into a paste. You want them to stay plump and fluffy for that perfect texture. If you're using the 0.5 tsp vanilla extract and 1 tsp ground cinnamon, fold them in now for extra warmth and depth.
🥘 Step 2: Combine with Rice Krispies for Structure
Pour the marshmallow mixture over the 6 cups Rice Krispies Cereal in a separate large bowl. Using a silicone spatula, gently fold everything together until the cereal is evenly coated. You'll notice the marshmallow starts to melt slightly from the heat—this is normal and actually helps bind everything. If the mixture looks dry, add 1-2 tablespoons of the melted butter to help it come together.
Press the mixture firmly into the prepared pie dish, using the back of a spoon to create an even layer. Pack it down gently but don't press too hard or you'll crush the cereal. The edges should be slightly thicker than the center—this creates that classic overhang. Place the dish in the freezer for 10 minutes while you prep the white chocolate topping.
🔥 Step 3: Add White Chocolate for Richness (Optional but Worth It)
Melt the 0.25 cup white chocolate chips in the microwave in 20-second bursts, stirring between each, until completely smooth. You want it to reach 110°F—just warm enough to be pourable but not hot enough to melt the marshmallow base. Drizzle it over the chilled crust, then use a fork to gently swirl it into the top layer. This adds a luxurious richness that pairs perfectly with fruit fillings.
Return the crust to the freezer for another 5 minutes to set completely. This final chill ensures the white chocolate stays firm and creates that beautiful marbled effect. Real talk: if you skip this step, your crust will still be delicious, but the white chocolate adds that restaurant-quality touch.
⏰ Step 4: Prepare for Filling (The Crucial Wait)
Remove the crust from the freezer and carefully peel away the parchment paper. You'll want to work quickly now—this is when the crust starts to soften. If you're adding a 0.5 cup heavy whipping cream topping (like for a cheesecake filling), whip it to soft peaks and spread it over the crust immediately. The cold crust will help stabilize the cream without melting it.
Here's where most people mess up: don't let the crust sit at room temperature for more than 10 minutes before adding your filling. The marshmallow will start to melt unevenly, leading to a soggy bottom. If you're prepping ahead, keep the crust refrigerated until you're ready to assemble—it'll hold together beautifully for up to 24 hours.
Pro Tips For Making Rice Krispie Crust
- Melt Butter Slowly: If you dump all the butter in at once, you’ll end up with a greasy mess instead of a crispy crust. Melt it in 15-second bursts, stirring constantly—just until it’s fully liquid but not browned. This keeps the marshmallows from turning into glue before the Rice Krispies get a chance to cling.
- Use Cold Marshmallows: I learned this the hard way—warm marshmallows melt too fast and make the crust soggy. Keep them in the fridge for 10 minutes before mixing, or even better, toss them in the freezer for 5. They’ll melt just enough to bind without turning the whole thing into a sticky disaster.
- Press Firmly, Not Fast: Ramming the mixture into the pan too quickly creates air pockets that weaken the crust. Press it in even layers, using the back of a spoon to compact it gently. Think of it like tamping down soil—steady pressure wins over brute force.
- Skip the Extra Cinnamon: The crust already has enough cinnamon from the marshmallows and Rice Krispies. Sprinkling extra on top just makes it taste like a spice cabinet exploded. Save it for the filling or dust it lightly over the finished dish if you’re feeling fancy.
Best sauces and condiments for rice krispie crust
Classic Caramel Sauce
Drizzle warm caramel sauce over your Rice Krispie crust for a gooey, buttery contrast that melts perfectly. I love using store-bought salted caramel sauce (like Smucker’s or Trader Joe’s) for convenience, but homemade is even better.
Simmer 1 cup granulated sugar with ½ cup heavy cream and 2 tbsp butter until golden, then whisk in 1 tsp vanilla. Let it cool slightly before pouring—it’ll create a glossy finish that makes every bite irresistible. 🍯
Chocolate Ganache
For a decadent twist, top your crust with semi-sweet chocolate ganache. Melt ½ cup chocolate chips with ¼ cup heavy cream over a double boiler, then let it thicken slightly. Spread it over the crust and chill for 10 minutes before adding fillings like berries or whipped cream.
The ganache adds a luxurious richness that pairs beautifully with the marshmallow base. Pro tip: Use Ghirardelli chips for the best flavor. 🍫
Berry Compote
Brighten up your crust with a fresh berry compote—strawberries, raspberries, or blueberries work perfectly. Simmer 1 cup mixed berries with 2 tbsp sugar and 1 tbsp lemon juice until thickened (about 5 minutes).
Let it cool before spreading over the crust, then top with whipped cream and a sprinkle of mint leaves for a refreshing contrast. This is my go-to for summer desserts. 🍓
Salted Caramel Cream
Elevate your crust with salted caramel cream—whip ½ cup heavy cream with 1 tbsp powdered sugar until soft peaks form, then fold in 2 tbsp store-bought caramel sauce. Pipe or spread this over the crust before adding fillings like cheesecake or fruit.
The salted caramel flavor balances the sweetness beautifully, and the cream adds a light, airy texture. 🥛
Nutella Swirl
For a kid-friendly (and adult-loved) twist, drizzle Nutella over the crust and swirl it in with a fork. The hazelnut-chocolate combo adds a nutty depth that complements the marshmallow perfectly.
Let it set for 5 minutes before adding toppings like sliced bananas or strawberries. This is a crowd-pleaser that feels indulgent but is surprisingly easy to make. 🌰
Cinnamon Sugar Crunch
Add a cinnamon-sugar crunch by mixing 2 tbsp granulated sugar with 1 tsp cinnamon and sprinkling it over the crust before baking (if making a standalone treat) or after assembly (if adding fillings).
The warm spices enhance the marshmallow flavor, and the sugar adds a delightful crunch. Press lightly with your fingers to help it stick. 🌿
Nutrition facts
Frequently asked questions
Can I make this crust without marshmallows?
Replace the marshmallows with 1 cup melted white chocolate chips for a richer texture. Use the same melting technique—mix with butter and sugar, then fold in the Rice Krispies. The crust will be slightly denser but still delicious. For extra crunch, add 1/4 cup chopped nuts like pecans or walnuts.
Why did my crust turn out greasy or oily?
Greasy crusts usually happen when using low-fat butter or overmixing the marshmallow mixture. Always use full-fat butter (like European-style) and stir gently to keep marshmallows plump. If the mixture looks too wet, let it sit for 1 minute to thicken before adding Rice Krispies. For extra insurance, chill the crust for 15 minutes before serving.
How can I make this crust gluten-free?
Swap the Rice Krispies for 6 cups gluten-free cornflakes or puffed rice cereal (like Rice Chex). The texture will be slightly different—more delicate and less crunchy—but it still holds together beautifully. For extra binding, add 1 extra tablespoon of melted butter to the mixture. Test brands first, as some gluten-free cereals absorb more liquid.
Can I bake this crust ahead of time?
Yes! Assemble the crust and press it into a pan, then refrigerate for up to 24 hours before baking. For longer storage, wrap tightly in plastic and freeze for 1 month. To bake from frozen, add 5 extra minutes to the baking time. Let it cool completely before adding fillings—this prevents sogginess. The crust reheats beautifully in the oven at 300°F for 5 minutes.
What's the best way to store leftovers?
Keep leftovers in an airtight container at room temperature for up to 5 days. For longer storage, wrap individual portions in plastic wrap and freeze for 3 months. To revive, thaw overnight in the fridge and warm in the microwave for 10-15 seconds. Pro tip: Store with parchment paper between layers to maintain crispiness.